originally written in 1994, updated occasionally)
The following are my opinions on the KR design , and how my particular KR2S has attempted to improve upon it. What makes me think that we can improve the KR? It's my understanding that the KR2 plans were drawn up with almost no changes after the prototype flew. Well, now that there are several hundred of them flying, 20/20 hindsight allows us to study the overall design and quirks in the aerodynamic behavior and tweak it here and there. I've read almost everything ever published on the KR series, and I've been studying aerodynamics and aircraft design (famous last words!). The following is a collection of what I've learned through my own studies and experiences, and from what other KR builders and pilots have passed on over the years through the email list, the KR Newsletters, and the KR Gatherings. Your mileage may vary. The comments below are provided only as food for thought, for those who care to do their own research...
More details on each of these subjects can be found on my main page at Mark Langford's KR2S project , but most of these opinions are only found here.
KR Building Reality Check
Pitch Sensitivity
Cockpit Width
"New" Airfoil
Wing Incidence
Aileron/flap planform
Belly Boards
Fuselage level reference
"Removable" Wings
Fuel Tank logic
Canopy options
Retractable Gear
Engine mounts
Engine Choices
Carburetor
CIS injection
Shoulder Belts
Birch or Mahagony plywood?
What kind of Epoxy?
Carbon Fiber and Kevlar
Taxi Testing
The Impossible Turn
Specs for the KR2S mention a 520 pound empty weight, but I feel sure that'll never happen with an 0-200 engine. Roy Marsh's KR2S (credited as the KR2S "prototype") approached some of these numbers with his 2100 Revmaster Turbo engine, but somehow it's never mentioned that his plane used a very thin laminar flow 23012 airfoil and shorter wings, which yields a higher top speed, but also yields a much higher stall speed than 52 mph.
Building time is another matter. I've seen build time listed as 800 hours, but I've never seen one that was built anywhere near that fast. And if it COULD be done, I wouldn't want to fly in it! Average seems to be somewhere between 1500 and 2500 hours, with longer build times being common. And the more changes you make, the faster those numbers will double, trust me.
Don't get me wrong, this plane really IS easy to build, but it is time consuming, and the plans are lacking MANY of the details that you need to actually finish building your airplane. There are "6 month sentences" in the manual, such as "sand aft deck to shape and cover with one layer of fiberglass". The plans leave much to the imagination, and much time is spent trying to figure out what you need to buy for your next work session. Fortunately for you, you have KRnet, and the many web pages that KRnet members have put out there for your quick education, and many ideas to achieve these tasks efficiently. This will substantially reduce the slope of the learning curve.
Resale value is the dark side of KR building. Don't think for a second that you'll ever get your money out of one. I don't know of anybody who's ever sold one for what they had in it, not to mention the TIME that they have in it. The reason is simple. Composite construction is "black magic" to most folks, and even wood construction is difficult to analyze for quality of work AFTER the plane is built. So that uncertainty leads to some skepticism when it comes time to buy (and fly) a plane that somebody else built.
If you build a KR, do it for the love of building and the learning experience, and the opportunity to build a truly unique airplane. I'm firmly convinced that the KR is the most inexpensive way to go 180 mph. Just don't build one because you think you're going to SAVE MONEY, unless you have a lot of time on your hands and you're an expert scrounger. The statement has been made that it'd be quicker AND cheaper to get a night job at McDonald's, save the money, and then buy an old certified aircraft, and I think that's true. But the KR building experience is all about skill, craftsmanship, resourcefulness, individuality, and pride in your work. If that's not why you're here, you should check out the RVs (and I wouldn't blame you). RV's make a lot of sense, but you'll end up with a plane just like a lot of other folks have, not that there's anything wrong with that, but they also cost a lot more than building a KR. Another lower-priced alternative is the Panther, which can also be Corvair powered.
Another plus to the KR's construction method is that it allows you to start out with maybe $1000 in Spruce and plywood, and that will keep you busy for a year. By the time your "boat" is built, you should've saved up enough money to buy everything to finish out the empennage, wings and top half (canopy, decks, etc). By the time you finish building those, you've saved enough to buy landing gear and get started on your engine. So it's an easy "pay as you build" system, rather than the more typical "plunk down $12,000 for the fuselage kit" kind of system, to be followed by several more equally impossible monetary leaps. This is exactly how how I built my plane....one small bite at a time.
I'd say most modern KR2S's are built for something like $15k, with some costing more, and others less. One builder finished a nice looking KR2S for about $8000 total, but he's an engine builder and body man, so that's conceivable. On the other hand, I've blown probably $24k on mine, but then I've built every piece three times, and have just about thrown money at mine, sparing no expense. And there are guys that have built KRs in 1500 hours, but they are not the show winners either.
Pitch sensitivity is the biggest problem with the original KR2 design, especially when flown with an aft CG. While roll rate and control might be considered "responsive", pitch control is simply too sensitive on many KRs. KR2s are flown with two fingers with which you exert some pressure, without really moving the stick. First-time pilots almost always go into a series of pilot induced oscillations (PIOs). It is said that one gets used to this situation shortly, but why have to? Personally, I'd rather get somewhere a little slower, than be exhausted upon arrival after fighting a twitchy airplane for several hours. This pitch sensitivity is caused by the lack of static margin. With a passenger and low fuel, the center of lift and center of gravity are almost coincident (aft CG), which leads to the feeling that you are balanced on the tip of a pin. The key is to build your plane from the start with the CG near the forward end of the envelope, not the aft end, because adding passengers and baggage will send your CG more aft.
The KR2S attempts to address this problem by moving the horizontal tail surfaces back another 14" behind the wing, while moving the firewall (and therefore the engine) 2" forward. This is certainly a large step in the right direction, but the plans still call for the same KR2 aft CG limit which results in "borderline" pitch stability. I built my KR2S 18" longer than the KR2 behind the wing, or 4" longer than the S plans call for.
Lengthening the fuselage was first publicly recommended by Neil Bingham in a Sport Aviation article titled "KR2 - a Critical Design Analysis". Many other builders have followed these recommendations, and are happy with the results. I established my final CG envelope by building the engine mount the proper length to locate the CG range exactly where I wanted it, towards the front end of the range. More on that at my "engine mount" page.
Another way to improve pitch stability is to increase horizontal tail area. On my personal example, I extended the horizontal stabilizer span 6" in each direction for a total of 84", while maintaining the stock amount of elevator area. This was accomplished by moving the aft h/s spar and elevator spar aft within the airfoil. I also used a 9% chord airfoil (NACA 63009) from root to tip, in an effort to make the stabilizer more effective while producing less drag. The result was an airplane that my 11 year-old daughter flew for the first time with no "pilot induced oscillations" at all, and she'd never been in a small plane before! I wouldn't have stretched the stabilizer at all had I possessed the foresight to extend my fuselage length another 14 inches (using the full 14' of longeron material that AS&S and Wicks ships with the KR2S kit) by simply adding one more 14" bay behind the aft spar for an increased moment arm. The smaller tail (in NACA 63009 planform) would have produced less drag, and would have been every bit as effective.
Having said all of this, some KRs fly very nicely once you've gotten past the light stick forces. These tend to be the ones with the CG biased toward the front. I firmly believe that you can build a KR2 per the plans and it will fly wonderfully (although light on the stick), IF you keep the CG in the forward end of the published range. The hit in top speed is almost not measurable. [Update 2014]Now that I also own and fly a "plans-built" KR2, I can tell you that a KR2 with CG biased toward the front is not at all difficult to fly in calm air (such as high altitudes), and can be flown "hands-off" in the longitudinal sense, doing the phugoid thing with about a 45 second period. Roll is another matter. It requires only slight corrections (such as leaning left or right), but if you don't catch it within a few degrees off horizontal, it will roll into an ever increasing spiral. Not dangerously rapid, but not good if you're asleep at the stick!
An analysis of the KR2S by Phd aeronautical engineer Dr. Richard Mole has revealed that using the aft two inches of the published CG range results in a fundamentally "unstable" airplane! Don't go there! I've done it (accidentally) and I can tell you that I'm lucky to have survived to tell the story (which is also on my webpage at "N56ML Weight and Balance". And if you'll ditch the header tank and go with wing tanks (and maybe a SMALL header tank) the CG will not migrate nearly as far during a flight, allowing you to set up the plane towards the front end of the CG range, where you'll enjoy a nicely controllable airplane from full fuel to empty fuel. My CG travels maybe a half inch from full to empty, so that's not an issue with N56ML.
With an inside dimension of about 34" at the shoulders cockpit width in the KR2 and KR2S (they are identical, despite public perception), it is simply too narrow for two normal (or even THIN) adults! An old Kitplanes article on ergonomics rated the KR2 dead last in interior width, and the one they measured had already been widened! It is a simple matter to build it wider. Just add a few inches to the dimensions given in the plans when fastening the two sides together to form the fuselage "boat". Many builders are now stretching the width several inches, usually about 3-4", but up to 6" in some cases. Mine is about 3 inches wider at the shoulders and it is just about perfect for my wife and I (and we're both pretty skinny). There are no structural ramifications with this change, but the factory-built premolded canopy and aft deck parts will not fit if the fuselage is stretched more than 1.5" wider, according to RR. The Dragonfly canopy fits fine however, as it is a bit wider, and a bit floppy (it's thinner and lighter), so it'll fit just about any shape fuselage.
I also moved the widest part of the fuselage rearward, so that it occurs at the shoulders rather than at the knees. This not only allows more shoulder and hip room, it has aerodynamic benefits as well. Tapering the fuselage inward before the trailing edge of the wing (as the plans call for) creates a high drag / low pressure area similar to one quarter of a venturi at the wing root. This drag producer can be minimized by keeping fuselage width at its maximum to a point at the trailing edge of the wing. The tradeoff of slightly more wetted area is worth reducing the interference drag in this case. I've been told that RR strongly discourages this, and can only assume that it's because they will no longer be able to sell you their pre-molded parts if your canopy and aft deck aren't shaped like the plans-built fuselage. I say that because I and many other have done exactly that, with no repercussions other than being able to carry a passenger without his/her around your neck, because that (or sawing the passenger's arm off at the shoulder) is the only way to fly with a passenger!
All plans-built models of the KR series use the turbulent RAF48 airfoil. It is used on the KR series because it was also used on the Taylor Monoplane, from which the KR was "derived". While this may have been an admirable airfoil in its day, it was designed in the early 1920's, without benefit of accurate wind tunnels or computer analysis. Since I wanted to understand my airplane's stability, and how to change it, I decided to use an airfoil for which more design information was available.
I am using the AS5046 airfoil, a 16% airfoil specifically designed for the KR2S series (mine, to be specific) by Dr. Ashok Gopalarathnam. Ashok and Dr. Michael Selig of the University of Illinois at Urbana have designed it to provide for a similar stall speed (without flaps) as the RAF48, but allow for a higher cruise and top speed due to its lower drag characteristics. The full story on the history, specs, advantages, and free downloadable full-size templates of this new KR2S airfoil are detailed at http://www.krnet.org/as504x/. Had my spars not already been built when this new airfoil was designed, I'd have used the AS5048 at the root, tapering to an AS5045 at the tip. This setup allows for stronger spars of almost the same weight (or lighter spars with the same strength), and 20% more wing tank volume. Since my spars were already built using "almost stock" dimensions, I was able to use the AS5046 airfoil. Again, RR strongly discourages use of any airfoil other than the RAF48, but I'm sure it has nothing to do with the fact that you wouldn't be buying any of their wing skins!
Wing incidence is another area where the KR series could stand a little tweaking. The plans call for 3.5 degrees of incidence at the root, with 3 degrees of washout. I've tried very hard to understand why the KR has 3.5 degrees of incidence. Discussions with one of the designers didn't help. My guess is that it was merely copied from the Monoplane, which was a much slower airplane, and perhaps could have used it. Another reason is that early versions of the KR were fairly low-speed planes, but at the speeds that larger engines now propel the KR, 3.5 degrees is simply too much. At 180 mph, this plane cries for something closer to 1 degree, based on a study run by Lionheart designer Larry French, and then another by Mark Lougheed. The proof is watching a KR doing a high speed pass a few feet off the runway. It resembles a Huey helicopter, nose tilted toward the ground. Flying one gives you the feeling that you're always descending. This means that while (most of) the wing is flying level, the fuselage, horizontal stabilizer, and engine are all pointed down at the ground at about 2.5 degrees. Some pilots report that they run out of "up" elevator trim when carrying no passengers. When flying close to gross, the trim comes closer to centered at speed. Of course, every KR is different, depending on references used, CG considerations, and other variables. Having flown a plans built KR2 and two other KR2S's, I've seen no evidence of this lack of elevator authority at all.
My wing incidence is set at 1 degree, with 2.25 degrees of washout. Obviously, the horizontal stabilizer incidence will need to change as well. Although my best guess is that it needs to be -.75 degrees, I've have made my horizontal stabilizer ground adjustable by adding a 2" x .75" .125" thick aluminum angle on each face of both horizontal spars connecting them to the longerons. This way I can fly the plane at cruise speed, trim it to fly level, and land without disturbing the pitch control. . Then, on the ground, the h.s. will be adjusted to reflect what the trim tab is trying to compensate for. By iterating on this procedure, I will eventually arrive at a point where my trim tab will be in line with the rest of the elevator, and my h.s. will be set perfectly for cruise speed with standard pilot and fuel. I will probably epoxy everything in place at that point for safety reasons, assuming no major CG altering modifications are foreseen. [At 900 hours on the plane, I added another -.75 degrees by shimming with another little piece of 3/32" plywood. I only did this because at 9500' 165 mph cruise, the trim was off by two LEDs on the MAC trim display, and -1.5 degrees centered it nicely].
Sept 2005 - Now that my plane is flying, I can tell you that the formula mentioned above works. You can let go of the stick and it will continue to go straight ahead, or slowly return to straight ahead if it was in a turn. Once high enough to get out of turbulence, this thing will track straight ahead if properly trimmed, and if not, all I have to do is move my arm or leg a little to redistribute the weight and it will gently turn, climb, or descend. The downside of the increased incidence is high altitude flight, and during flare to landing, so 2 degrees of incidence with the new airfoil setup is fine also.
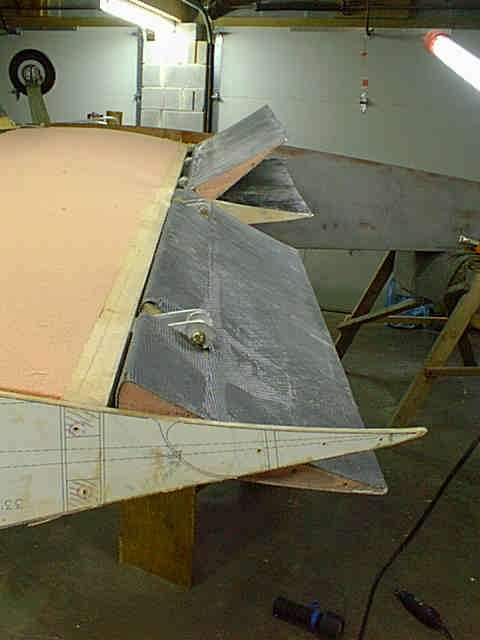
While on the subject of wings, I have changed my ailerons to encompass a larger percentage of the chord, and moved them outward so that I have more room for flaps. By placing them further outboard, the moment arm is larger, so the aileron length can be reduced, leaving more room for flaps inboard. My flaps also attach to the aft spar, and occupy the outboard wing section rather than inboard. I am using split flaps for drag purposes during landing, since takeoff distance is pretty short anyway. These split flaps lower my stall speed by about 5 mph, and give me a much better view of the runway on final and while landing. My flap control rod (tube) is located inside the wing (between stub and outboard wing), out of the slipstream. Split flaps allow this configuration. Also, split flaps produce more drag when deployed than the stock slotted flaps, slowing the plane quicker when trying to land the slippery KR in ground effect. Flaps are never be needed for a short field takeoff, since the takeoff roll for a VW or Corvair powered KR is half of the landing roll, thanks to the high power to weight ratio and slippery airframe.
Many KR builders have incorporated a belly board into the bottom of their aircraft. This provides a better view of the runway while flaring, and more drag to reduce landing float. These are much easier to install than flaps (especially if your KR is already finished), and provide the same benefits on landing, and surprisingly, stall speed is even reduced a couple of MPH. Definitely the easy way out, and almost as effective as flaps.
One little area of concern in the current KR2S plans is the lack of a standard horizontal reference plane, from which wing and tail incidence can be measured. After forming the "boat" by bending the sides to shape, the upper longerons become bowed into what has become known as the "banana boat". This in itself is no big deal, but you now you have no flat, level surface to call a reference. One solution is to use the local area of the longeron directly above and between the main and aft spars. As long as you use this same area as "level" when defining other critical angles, you'll be OK. I personally think that trying to compensate for the geometric changes by curving the top longeron is more trouble than it's worth, since all of the side members would need to be cut to some small angle rather than 90 degrees.
When building my plane, I defined "level" as being the upper longeron between the main and aft spars. For extensive information on leveling your KR (especially as it applies to wing spars and horizontal stabilizer installation), see Wing Spars.
Lots of folks are drawn to the KR because of it's "removable wings". Unfortunately, this an an operation better suited to initial transport to the airport, or getting it back to the airport after an off-airport landing. It takes at least a half hour to remove the wings, and 1 to 2 hours to put them back on again. And each time you do it the wing attach fitting holes suffer some amount of wear. If saving tiedown or hangar fees is your main objective, you should look at some other plane that has "really" removable wings, or do the research, implement it, and let us all know how to do it!.
Here's my fuel tank logic. Although I've already built a 17 gallon header tank, I've removed it and would turn it into a baggage compartment if my front hinging canopy didn't cut it in half. I have built a fuel tank into each of the two stub wing sections. Reasons:
My canopy is a Dragonfly. I chose it because it is designed for a plane that is roughly 6 inches wider than the KR2S, And because it is thinner and more flexible, would be easier to deform to fit my 3" wider fuselage. This canopy can easily be used on stock width KRs, as well as those widened 8" or so. The R/R KR2S canopy is 3/16" thick, and may be quieter than my 1/8" thick Dragonfly canopy, but I can think of many other noise sources which would factor into that equation. And the Dragonfly weighs one third less than RR's KR2S canopy. Dragonfly canopies are sold only by
Slipstream Industries, and can be bought in several tints. A new canopy option has recently evolved, but it is is "blown", resulting in a more rounded bubble, by Todd's Canopys for under $400 and also come in various tints.
The gullwing layout makes the most sense from the standpoint of keeping water out, and structural integrity, with its integral roll bar. But it is more difficult to get into than my front-hinged canopy. My front hinged canopy is more susceptible to wind damage or propwash, so I'm careful about that. If I were to do it again, I'd make the joint between canopy and front deck foward of the canopy as a section through the deck, which lessens the importance of the high pressure area at the joint, and minimized water and air leakage.
The original KR retractable gear was one of the worst features of the plane. It had a bad habit of collapsing during a hard landing, or if it didn't collapse, it would punch a hole through the top skin of the wing! A "positive" lock was developed by Rex Taylor and others that helped with that problem, but the gear was still so short that it forced the flaps to be miniscule and ineffective (otherwise they'd drag the ground), limited prop clearance, and made the landing angle of the plane so shallow that you can't get anywhere near accomplishing a full-stall landing. Not only that, but since the tires are much taller than their wing's storage compartment, they stick out into the slipstream and create more drag than a properly faired set of fixed gear! Those who've upgraded to the Diehl or Grove fixed gear have realized a higher top speed and something like 10-15 pounds less weight, and no more "gear up" landings. The only losers are the prop manufacturers.
For over twenty years, "Diehl" gear main gear was the standard fixed gear option for KRs. The legs were made of 3M Scotchply, an excellent material for gear legs. There were both a taildragger and tri-gear setup available. The only downside to the Diehl gear was that gear leg length is limited to 24", and setting alignment is a tad tedious. Dan's gear could either be mounted as conventional "taildragger" gear or as tricycle gear, depending on which side of the spar you mount the gear brackets to. Diehl also offered a nose wheel setup. It required a special engine mount, or modifications to your existing mount. Diehl gear is no longer available, but there are other suitable options available that work well also. Ask on the KRnet email list for latest recommendations on that.
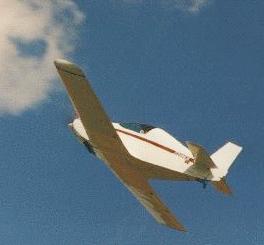
If you really have a retractable gear hangup, you can imitate Don Betchan's motorcycle fork retract system (his is the plane in the photo at the top of this page). His gear retracts completely into the wing, and looks marvelous!
Tracy O'brien's axles and brakes are a lightweight and inexpensive alternative to Clevelands. Matco is another good source for light and less expensive brake and wheel setups.
If you're having a hard time deciding whether you want trigear or a taildragger, consider these facts. There's no question that landing a taildragger is fraught with more peril than a tricycle gear airplane, and insurance rates reflect that. If you are not already qualified to fly a conventional geared airplane, there will be a period of time when your hull will not be insured until you have sufficient hours. The trigear planes look more "substantial" to me, but the appeal of the taildragger is that it makes you a better pilot, simply because you have to fly the plane "all the way to the tiedowns". Conventional gear also weighs less, creates less drag, and costs less, but insurance costs probably cancel out that last one. It's a toss-up, and your decision entirely.
The commonly available KR engine mounts are very narrow, and unecessarily concentrate the loads toward the center of the firewall braces. The RR cure for this was to mount two 4" x 2.5" x .125" aluminum angles all the way across the firewall (one high, and one low), but the bottom one has to be reformed to a 101 degree angle, not a job for the typical homebuilder, I'd guess. And that's 5.5 pounds of weight that I didn't need! I built my own engine mount, using .75"x.049 tubing. The mounting points extend to the upper corners of the firewall, near the longerons, and the lower ones as close as I could get them without interfering with the exhaust system.
As a VW guy from way back (and still going strong), I had been planning on using a bored and stroked 2600cc Type 4 bus engine. In fact, it's already built and sitting on my basement floor. I even went so far as to design (not completely with drawings, so don't ask) a drive shaft setup for it that I think would work. But I've discovered the Corvair engine. Yes, I've gone to the other side! At Sun N Fun 99 I heard William Wynne speak on the Corvair engine at Contact Magazine's forum tent. Needless to say, I SAW THE LIGHT! The possiblity of 140 hp from an inexpensive 245 pound proven bulletproof 6 cylinder was too hard to resist. My Type 4 would have been at least 225 pounds, after adding the prop drive shaft. And there was something about testing:
100 hp is not uncommon from a stock 110 hp Corvair running at 2800 rpm, but I've bored mine out to 3100 cc, an increase of 15%, and also plan to run my 54" diameter wooden prop at 3800 rpm (full throttle) so that'll be another 18% increase, which adds up to around 130 hp. See my Corvair page for details and how that worked.....pretty well after the addition of a "front bearing" Do NOT expect a Corvair to work for long without an oversize front bearing to handle the prop loads.....the crankshaft can't take it without a "fifth bearing" out front, like the "Better than Air" fifth bearing that Dan Weseman makes for the Corvair engine.
Why not the Subaru? Even if a Subaru weighed the same as a Corvair (but they are heavier) and put out the same power (they are less powerful), there are three reasons why I have no use for a Subaru:
Why not an 0-200 or 0-290G or some other certified aircraft engine? Price and availablity of parts, is one consideration. William Wynne likes to tell the story of the typical homebuilder who buys a $5000 runout aircraft engine, and tears it down for a total rebuild. If the guy knows anything about engines, when he gets to the lifters, cam, rings, and other wearing parts, he'll look at them, find some wear, and trash 'em. Then, later, after he's searched for parts and found how crazy high the prices are for "aircraft" engine parts, he'll come back and pull those same parts back out of the trash and say "well, maybe they're not so bad after all". With a Corvair you open up the case and throw just about everything inside away, and never look back. A full set of 12 lifters for a Corvair is $42. A full set of rings is $48. And these are parts that are built using the latest state of the art materials and processes, not parts who were built under STC 40 years ago! Going price for a Corvair core is a hundred bucks. Throw another $2500-$3000 at it and you'll have a practically brand new engine, running on 6 smooth cylinders, with a history of reliability.
Having said that, I would not fault anybody that can scrounge or afford an O-200 for putting one in the nose of a KR. If safety is your number one consideration, it's a no-brainer. Most of the fastest KRs are O-200 powered, but some are also hot-rodded a bit!
I started out thinking that Bosch CIS fuel injection would be a great choice for an airplane. It is purely mechanical, with only the fuel pump and cold start valve being electric. By the very nature of its design, it will compensate for altitude automatically, to some extent. And because there is no venturi involved, carb icing will be a thing of the past. The cold start valve will eliminate any need for a primer, and do a better job of starting the engine, no matter how cold it is. The problem is that all of this stuff ends up weighing about 23 pounds, and takes up a huge amount of space! Compare that to a 3 pound carburetor like the Aerocarb or the Ellison, which takes up very little space, and are dirt simple, and are very reliable.
The Megasquirt system is one that holds some promise for fuel injection and ignition, but is still susceptible to instant failure.
Which carburetor? For Corvairs, the C-85 carb is perfect (ask William Wynne exactly each one), but just about anything will do. Several guys are having great luck with everything from the Aerocarb and Ellison to the Harley CV carbs. I started with a 40DCOE Weber carburetor for my Corvair engine, but the lack of mixture control lead me to the Ellison EFS-3A before my first flight. It works flawlessly to date, so I have no complaints. For VW use, I wouldn't touch a Posa! Posa's are a real pain to get the mixture correct at both the idle and high end of the range, and have a bad habit of the main jet falling out at inopportune times. Jim Faughn managed to do it, after laborious reshaping of the needles and lots of trial and error. It just seems like there are too many easier, more reliable ways to run a VW without resorting to something as unreliable as a Posa.
One reason the Posa is so flaky is because it's a gravity feed "carburetor". People like to say that gravity never fails, but I disagree. There's usually a large difference between the amount of fuel pressure you get straight and level, and during a climb. That's because the fuel tanks are aft of the engine, and when you point the nose of the plane up, the pressure can be reduced substantially from its already low pressure level. Fuel pumps provide a constant, higher pressure level, which yields consistent and predictable fuel mixture levels during all phases of flight. Fuel pumps weigh more than "nothing", and you'll need two of them to be redundant, but in my mind it's worth it. See my fuel system page for more details on how I made it work.
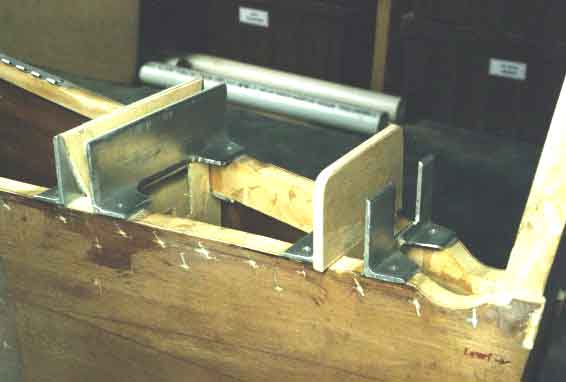
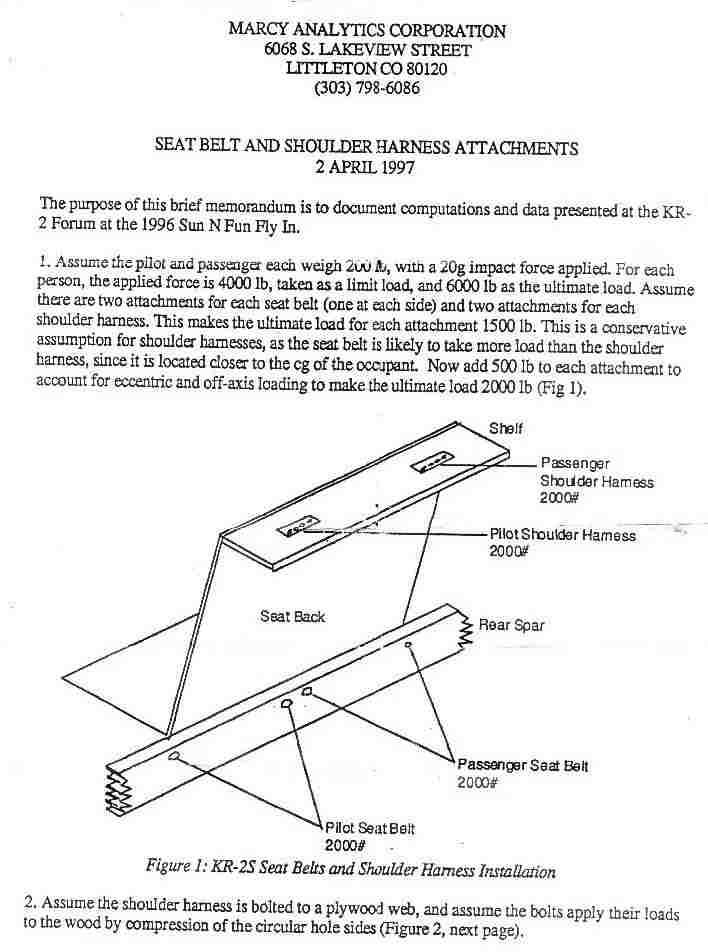
One question that often crops up on KRNet is shoulder belt attachment. Rand Robinson has published plans to mount shoulder belts across the rear seat brace shelf (behind the pilot's shoulders), but you'll need to make it from 1/4" plywood rather than the 3/32" called out in the plans, and also add another 5/8" longeron doubler over the length of that shelf to help transmit the loads to the longerons. See sheet 1 and sheet 2 of the update for details. Having said this, this seatbelt layout violates conventional wisdom of shoulder harness design as detailed in Chapter 9 of AC 43.13-2A. The problem is the attachment point...it's way too low. In a frontal impact crash, your body weight will be thrown forward, and when the harness tightens, will effectively stuff you into your seat, compressing your spine. Not a good thing! Although I am not willing to claim that it is any better, you can see what I did for harness mounts on N891JF.
Often, the question arises "which should I use, Mahogany or Birch plywood" for skinning the fuselage. 5 ply Birch plywood is about 25% stronger than Mahogany faced poplar plywood, but is also about 25% heavier. That penalty translates into about 15 pounds for the airplane, and weight is everything. Mahogany is absolutely beautiful, is sufficiently strong for the job, but is almost twice as expensive as the Birch. As you can see from my fuselage pictures, I used Mahogany. Keep in mind that the plans call for Birch on spar faces, and I did use it there.
I use T-88 wood epoxy for joining wood. It is as strong as they come, and is well proven. It also has the benefit of being able to cure down to 50 degrees, and is easily mixed as a two part system consisting of equal volumes. It also has excellent gap filling qualities, up to 1/16". Its thick consistency makes it suitable for use on vertical surfaces.
Aeropoxy is my favorite epoxy for composite use. It is not very viscous and fiberglass is easily wetted out. Mixture ratio is 100:27 by weight. I have had no adverse reaction whatsoever to this stuff, unlike almost all other epoxies that I've dealt with so far. Buy a digital postal scale from Aircraft Spruce East for $80 and get perfect ratios every time. These scales are accurate to within .1 ounces or 2 grams. Also, Office Depot has a Pelouze for about $60 that has a resolution of only 1 gram, so try to get that one first!
I used carbon fiber in several places on my airplane, mosly as a replacement for several otherwise heavier layers of glass. On the KR, the skin is only one layer of fiberglass in most places, so switching to carbon fiber doesn't save you weight here, but does gain strength and stiffness. So the obvious place to use carbon fiber is in places where you'd otherwise need to use more than one layer of fiberglass. For example, the canopy frame. This is one place where I should have used several layers of CF rather than fiberglass, and my canopy frame would have been a whole lot lighter, and much stiffer. Carbon Fiber is about 3 times stronger, 5 times stiffer, and 6 times more expensive than 7553 (KR) fiberglass. It makes sense to use it wherever you can afford it, especially the elevator and aileron surfaces. I used it over my entire wing, mainly to provide more torsional stiffness since my flaps are so huge, but now I don't have to worry about my top wing skins flapping in the breeze while flying. One place you DON'T want to use carbon fiber is on your turtle deck or vertical stabilizer if you have radio antennas under there. It will effectively block radio and GPS reception and transmission.
Kevlar has no place on a KR, and that's about all there is to it! Although Kevlar is great at resisting penetration (bulletproof vests), it is weaker than CF, and has little stiffness. But worst of all, it is virtually impossible to cut with a normal pair of scissors, and sanding it is nothing short of a nightmare. The carbon fiber that I used had ONE Kevlar tracer thread located along one edge, presumably to clarify the edge of the material. Whenever I screw up and leave that edge at the top of a layup, I have to squeegee filler over that joint to completely cover it. If I'm not very careful and sand into the Kevlar, it fuzzes up and becomes impossible to deal with. It won't go away at all, so my only choice is to try to use filler to plaster it back down again, and then control the later urge to fine sand it again, fearing more of the same. I can't imagine making an entire part out of the stuff. An engineer in our EAA chapter (now working for Burt at Mojave) built his first Defiant cowling out of Kevlar and it made him crazy. He built his next one out of carbon fiber and he swore he'd never touch Kevlar again!
Taxi testing - Some folks thing taxi testing is a bad idea. But how do we learn things? Practice! Quite often I'll fly up to nearby airport with no traffic and a 6000' runway and do 10-12 touch and goes just to hone my landings. These include tail all the way down and then full throttle to go through the regime you dread so much TWICE with every touch and go. You could argue that I should minimize my risk and simply fly around the area for an hour and then just land once...or better yet, don't fly at all! That's a lot safer.
Learning the behavior of your plane in the critical phase between flight and landing is probably THE most important aspect of flying a taildragger. Why not take a cram course and really learn it in a couple of afternoons with calm winds and no other distractions than learning the nuances of how the plane reacts? I went out early on calm days before anybody else was flying and do one down 36, do a U-turn, and then do another one down 18, calling it in the the radio the whole time. Another thing you quickly notice is how quickly the tail is up and rotation speed is achieved. This is a good data point for how much runway you're going to need. You can test the way it handles with and without flaps, for example.
And you quickly learn where the stick should be, and how to gently let the tail down after pulling power and slowly giving it full forward stick. If you leave the ground without this kind of experience you might do something really stupid...like try to take off with the stick full aft or something!
Taxi testing is a great opportunity to master the most critical part of landing, so on your first flight you can concentrate on the NEXT most important part of landing a KR...getting the speed right to make (or simulate) the first landing. You'll already have a really good feel for the transition phase, so you are dividing up the learning effort, and the stress of that first landing.
If my plane were super squirrelly, I'd want to identify that early and FIX it before my first flight. The gear may not be aligned properly, for example. My taxi testing wasn't a testimony to my skill...I had 18 hours in a Champ, which is nothing like a KR. My KR2S handles wonderfully on the ground. Troy Petteway says KRs are the best handling taildraggers he knows of, and mine is the best handling KR he's ever flown. If it were a real handful, I'd want to know that before my first landing, and would certainly try to fix it before I tried to land it under the duress of something like an engine-out on takeoff on my very first landing. How much do we want to stack the odds against ourselves on the first flight? Why not master the transition and get past one of the biggest hurdles before that big flight?
Obviously, I'm convinced that taxi testing is a no-brainer. Just don't START your learning on a windy, gusty day with the stick full aft, and you'll likely be fine..
The "Impossible Turn" - Once you've had to dead-stick a plane in with no power, it occurs to you that it would be really bad if you had an engine failure on takeoff. So I practiced some to gain the confidence and to identify an altitude I take off and head about 20 degrees off to the right while climbing out at
about 100-110 mph, and when I reach 500' AGL I chop the throttle to idle. I
simultaneously start a turn back to the left and haul back on the stick to
gain altitude and get to best glide speed, which is about 90 mph. That gets
me about 130 more feet of altitude (according to EIS data). Starting that
turn back when you have a lot of speed gets you going the right way in the
safest manner, and prevents you from getting even further from the airport.
Then I glide back toward the runway at 90 mph, continuing the turn as
steeply as I think I can get away with at that speed, 40 degrees or so.
Once I have the runway made, I drop the flaps and slip it in to put it on
the end of the runway. On all attempts from 500', I easily made the runway,
usually with an extra 100-150' feet of altitude to spare, so theoretically I
could make it from 350' AGL, especially with any kind of headwind on
takeoff.
It takes about 38 seconds from full throttle to hit 500' AGL, so if the
engine will just hold together for one minute on takeoff, I'm fairly safe.
I could climb out at 80 mph, which yields a really steep angle and would
work even better, but I quit doing that back when I figured out it wasn't
good for the crank shaft or for oil temperatures during the summer. Folks
with underpowered engines and slow climb rates will not fare so well. On my
plane, I've already proven that the engine at idle and the engine switched
off yield exactly the same glide speed, so these tests are pretty accurate.
It should be noted that I spent about an hour one day at 5000' at near-stall
speeds doing really sharp circles to prove to myself what minimum speeds for
certain bank angles are, so that's the first step in doing this kind of
testing. I never actually stalled the plane in a sharp bank, but I maintained steady indicated airspeeds for plenty long enough (circles for several minutes each with flaps up and flaps down) to identify the minimum. I KNEW it was ready to drop a wing...it was too obvious that I was hanging on the edge, but it gave me a good feel for when it was ready, as well as that valuable indicated airspeed for future reference.
More opinions later, as time permits...
Return to Mark Langford's KR2S project
Reality Check - Are the performance figures given by RR for the KRs optimistic? Definitely! I sincerely doubt there has ever been a particular KR2 that weighed in at only 480 pounds, could take off in 350 feet while landing in 600 feet, could achieve a maximum speed of 200 mph (although you could argue that's Vne), and CRUISES at 180 mph, with a 1600 mile range, with a climb rate of 800 fpm gross, on a 2100 cc VW engine! I have no doubt that each of these specs could be achieved by various planes, but not the SAME plane. Another consideration is the technology of the time...it was far more difficult to get accurate speeds without the aid of GPS and careful correlations to groundspeed on a calm day, especially on the slow end of the airspeed spectrum.
1) Safety - if I crash it, I'd rather not have 17 gallons of fuel in my lap, along with 150 feet of wiring connected to a battery. With the tanks between the spars in the stub wings, they are well protected.
2) CG reasons - as fuel burns off, very little CG shift occurs with wing tanks because of their close proximity to the CG, but when it does move it would be moving forward, so when it comes time to land, the plane is as stable as it ever gets, not as UNstable as it ever gets (as with a header tank). I've heard some wild tales about landing a KR with 2 people and little fuel on board. Of course, each KR is different (disclaimer), and not all have their CG's properly set up. I adjusted my CG limit with the engine mount, with half full wing tanks and one aboard. With the wing tanks and no header tank, my CG isn't nearly as shifty as what it would be with only a header tank.
3) As for weight, my whole front turtle deck/fuel tank weighs 11 pounds, so I wouldn't expect a terrible penalty with two wing tanks. And my VDO fuel level senders weigh only 2.3 ounces each. I will, however require an electric fuel pump, so there's some weight I wouldn't have with a header tank.
4) My right tank is the full time fuel tank, with fuel pickup and a return line. The left tank is a sort of staging area (call it a "header tank) for fuel which will be transferred to the right tank mid-flight. This way, I don't have the weight and complexity of a fuel selector valve. It's a one-way street between the transfer tank and the main tank. The only plumbing in the transfer tank is a drain and a vent, and and also a fuel guage sending unit. I made a little 555 timer circuit that when activiated, runs the transfer pump for enough time to transfer about half of the fuel from the transfer tank to the main. Two taps of the button during flight will automatically transfer all of the fuel, and a green LED on the panel indicates the transfer
. The switch can be toggled the other way to switch the pump off when it's done, if necessary.
5) Gravity feed is often ballyhooed as the simple, safe way to provide fuel to the carb. This works great in a high wing plane, but the KR's header tank is only a foot higher than the carburetor. Not much head to draw on there! This small amount of head changes considerably at different pitch attitudes. During climb, you have maybe half the head than in cruise. Personally, I'd rather have a mechanical or electric fuel pump providing consistent pressure to the carb. Perhaps the best of both worlds is to have a small one or two gallon header tank located up front, fed "on demand" by a transfer pump. Any problem with the pump would still give you 10-20 minutes of flight time, and the weight would be negligible.
1) a new airframe with many aero mods
2) A new Type 4 engine
3) A drive shaft system, and
4) A radical CIS fuel injection system,
that didn't really appeal to me. Maybe after the airframe is tested I'll add CIS, but I already doubt it.
1) PSRU. One more mode of failure that you just don't have on a direct drive engine. You're flying behind something that's
probably had very little engineering or testing. And even if it was
"engineered", that's still some guy's best guess. Engines are just plain
too complicated a system to accurately model and then be able to predict
with any accuracy the torsional characteristics of the system, not to
mention that it changes with every different prop combination that's tried.
Torsional vibration is a dicey subject even for the "big boys". Designing a
PSRU and building it at home is a roll of the dice until somebody's got a
whole lot of hours on one. Ask GPASC if torsional vibration is an exact science!
2) Water. Another mode of failure. Spring a leak from any one of 8 or 10
places and you are going down shortly. This can't happen with air-cooling,
period.
3) EFI (if so equipped). Any one of several wires can develop a bad connection and your
engine might just quit instantly, regardless of how smart the computer, or
how good its memory is. The reliabilty that Soob cars enjoy is no longer a
guarantee, now that you've ripped the whole thing out of a car and spliced
it all back together in your plane. And they have to have electrical power
to work at all. This is not an issue with a carburetor. You could argue
that a chunk of debris could kill a carb, but that same chunk would kill the
EFI too...which is why you use fuel filters and clean fuel. Fuel under high pressure? This is never a good thing...
Why stack the odds against you AND weigh more, to have less power?