originally created May 26, 1998, updated in 2010...12 years later.
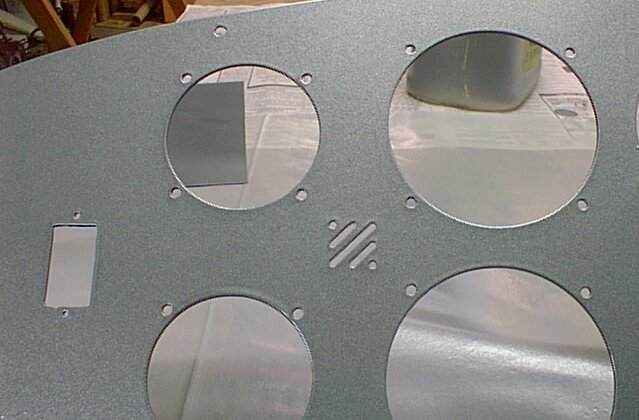
I had my instrument panel waterjet cut per the CAD file that I made up to fit my foward deck. This was the first cut effort. It was made from .090" 7075-T6 aluminum, which was both heavy and expensive, and I discovered that I wouldn't be able to bend the bottom without a huge radius. This is one of those things you chalk up to "lessons learned". 7075 is pretty brittle stuff, so take my advice and use 6061-T6 instead. I also decided to change my circuit breakers to the more colorful Carlingswitch rocker switch/breaker, added the top curvature, and made some other hole tolerance adjustments, so this panel became a conversation piece. Since I was going to waterjet it, the rectangular holes for the breakers was not a problem.
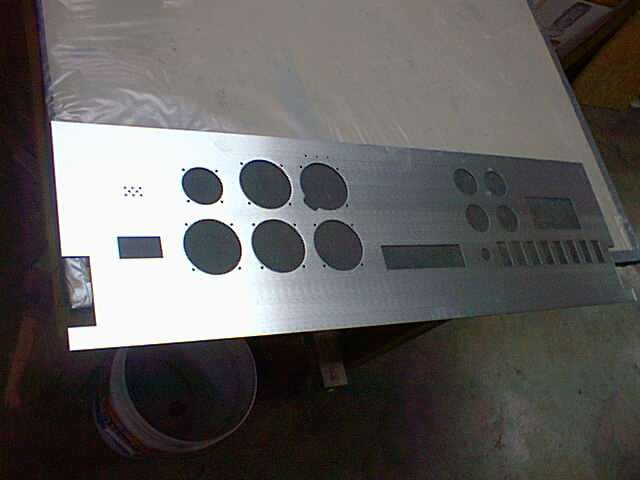
Here's the version that the final instrument panel was cut from. The panel was cut by importing my CAD file directly into the waterjet cutting program, and no other adjustments were required. Total cutting time was about 20 minutes.
I had my panel waterjet cut by Carmin Industries in Jacksonville, Alabama (1-888-436-8855). I wasn't looking forward to cutting all of this stuff out by hand, and now it's accurate to within .002"! They wouldn't have been thrilled to have made anything for an airplane (for insurance reasons), but didn't mind a bit cutting out the dash panel for my "offroad vehicle". This panel is .062" 6061-T6, which is perfect if you fold the bottom under to stiffen it. Mine is bent to a 3/4" radius, so there's no sharp edge down there to chop my legs off in a crash.
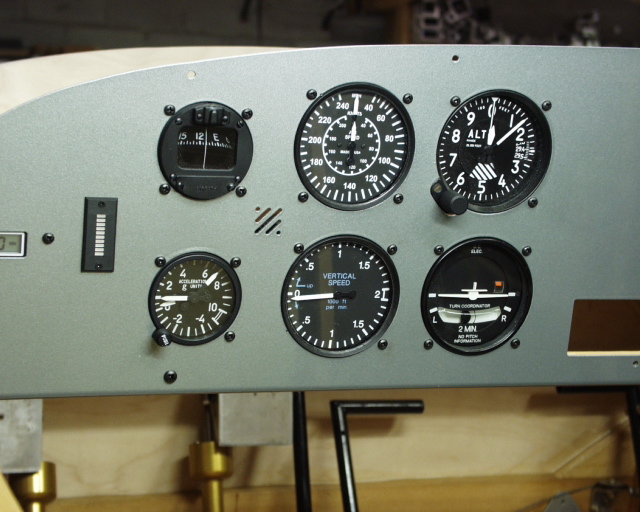
I mounted all of the instruments (except for the large-screen GPS that goes over the radios, and Engine Information System that mounts to the right) to check for proper fit. Next I folded the bottom back 2.5 inches (and 4" would have been even better) to stiffen the panel and provide a "shelf" to locate headphone jacks, run wires along, and put those little thing like PTT relays and terminal blocks, and then paint it. This saved me a lot of time, to say the least, and the accuracy of the mountings holes is right on!
Instruments go in "forever" tomorrow...
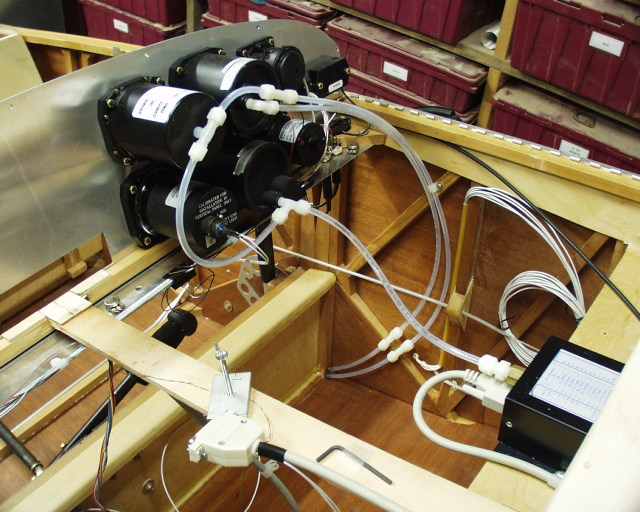
I've just finished connecting all of the static and pitot lines. That's the altitude encoder mounted on the firewall shelf to the left.
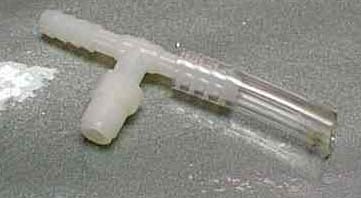
One thing I learned about this is NOT to use barb fittings and 1/4" ID tubing. Yes, it slipped together easily enough, and I figured I'd never have to disconnect it, so why worry about a conventional threaded fitting? Well, less than a minute later I decided I needed to remove it. Nope, it ain't gonna happen. I eventually cut the plastic line and put the tubing in a vice, squirted silicone all around, pried with a screw driver, and just about dislocated my shoulder trying to salvage these 25 cent barb fittings. The threaded fittings and NyloSeal are much more convenient, and that's what I'm now flying with.
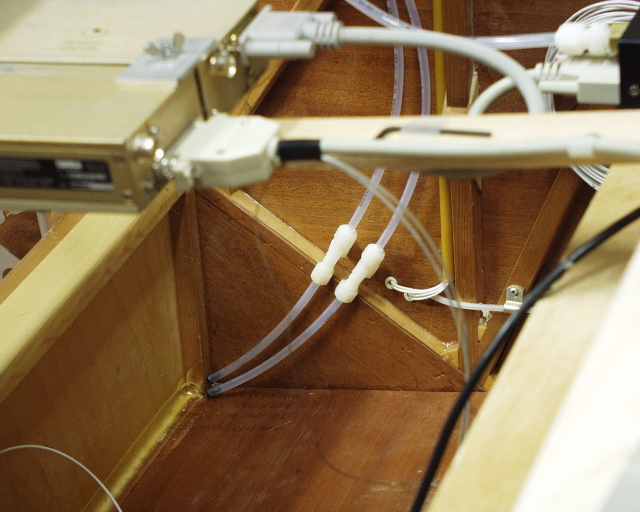
The static and pitot lines exit through a T out into the stub wing. The two short lengths of tubing that you see laying down next to the front of the main spar are for drains. I'd have never thought of that, but Tony Bengelis says do it, so I did it. Just loosen the nuts, drain whatever water is in there, and reinstall every annual. So far I haven't seen any water in there though.
The Engine Information System is on the right The beauty of the EIS is its alarms that notify you when a preset engine parameter gets out of bounds (that YOU set!). For more info see http://www.grtavionics.com/.
Although I really wanted to paint this thing with some of that GREAT high quality Rustoleum (that's a joke, son) that I've been hearing so much about on KRNet, I couldn't find a color that I liked in Rustoleum. So I had to lower my s
tandards and settle for DuPont's Imron Charcoal Gray Metallic. At least I can take solace in the fact that it cost 10 times more, but will last 100 times longer! And it sure makes this panel look nice! I think I'll paint most of the interior with this stuff, and maybe the bottom of the plane.
Below is the cost of my panel, basically. The panel itself was about $20 worth of aluminum, with water-jetting the holes costing $100. Paint was about $30, but I still have about 9/10 of the quart left for other interior painting, such as the inside of the canopy frame.
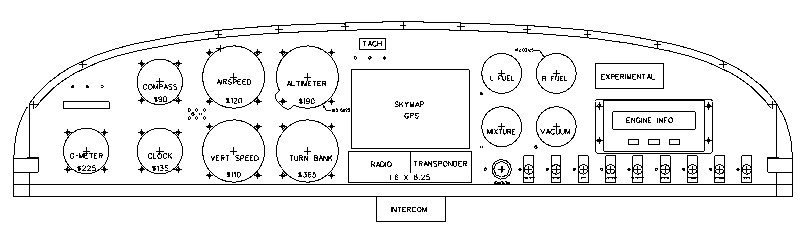
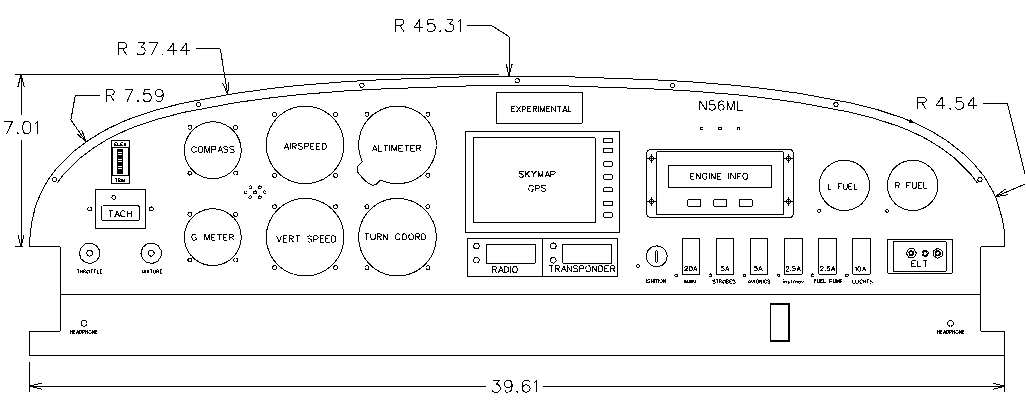
Below is what I have in the panel so far:
  G-meter:      $200
  Compass         60
  Airspeed       120
  Altimeter      200
  Vert Speed     110
  Turn Coord     380  (don't buy a "Falcon" import!   Noisy, with RFI).
  Fuel pumps(x2)  60
  EIS           1150
  Com/Transp.   2200
  Encoder        165
  Tiny Tach       50  (don't waste your money!)
  Breaker/sw     130
  ELT            185
  ignition sw     20  (Cole Hersee 9513, 10A)
  --------------------
  total        $5120
I'm always looking to save weight, and was quite intesrested in the Black Panther batteries in the Wicks catalog. They list one that has 600 CCA (cold cranking amps) that I later discovered is a 16Ah (at 10 hours) battery, for $113. I looked at Gills, Bells, Interstates, etc, and finally came full circle to the actual manufacturer of the Black Panther, which is Hawker Energy Products. The standard aircraft batteries are typically 25 or 35 Ah. The AGM technology used in the Hawker Genesis batteries makes them very reliable and with an amazingly high CCA value for cranking things like large 6 cylinder Corvair engines. They are also permanently sealed (by definition) and can be mounted in any orientation. The battery I'm flying with is a sealed lead acid Panasonic 18 Ah UPS battery (PS12180-NB) that weighs about 11 pounds and cost me $30. It has always fired the Corvair up without problems.
My KR2S electrical system is very current miserly. My radio and transponder are Terra (less than 2A combined), strobes are Kuntzlemann (less than 2A draw), ignition is coil and points (1A per 1000 rpm) totaling 3A at cruise, and my nav lights are super bright LEDs that are sold for RVs, that draw less than .1A. All of this can be turned off so that only the engine's coil and fuel pump are running, which totals 3.7 amps. My ignition switch will control ignition coil and fuel pump without a breaker inline (if either quits, you're going down anyway), but all other electrical items will be separate and will have breaker/switches. I call this my "almost totally redundant fuel/ignition system".
The 18 Ah Panasonic battery that I chose will run this "minimum load" for 4 hours! After talking to several other aircraft owners, I've found several others using similar batteries, one even using an 8Ah battery to power his 2.2 liter JPX engine, so I think I'm on the right track here.
My EIS (Engine Information System) has programmable alarms, and the voltage trigger level can be set to 12.8 volts so that if my alternator quits charging, the EIS will immediately notify me and I'll have something like 3 hours to find a landing spot even without bothering to switch off the radio and transponder! For ME, that's a good enough margin. And it is very compact, with a height of only 3 inches, perfect for the upper firewall shelf of a KR.
Here's what it looked like during wiring...about a million wires running everywhere. With my 20/20 hindsight, I highly recommend that you do whatever it takes to find some colored Mil spec wire. A bundle of white ones is hard to decipher!
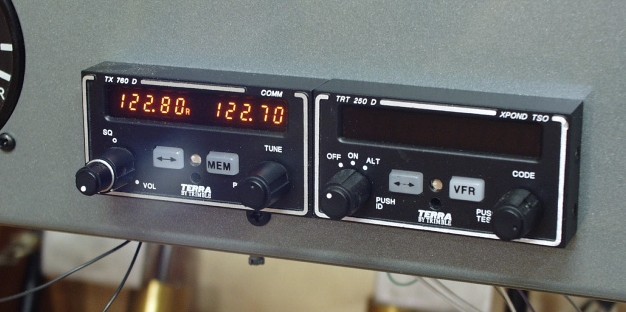
The radio was the first thing on my list of things to wire. I'm using a Terra TX-760D tranceiver which is only half the width of a normal radio. This allows both transponder and transceiver to be located in one 1.25 x 6.25" cutout.

By leaving off the two steel mounting trays I saved 22 ounces! The rest of that story is strobes and antenna construction.
There's also an identical LED (Hosfelt #25-405) located above the ignition switch, and it functions as the alternator light. Whenever the ignition is turned on, but the alternator isn't charging, it lights. But just like your car, it goes out as soon as the engine starts and the alternator starts charging. If the alternator quits in flight, this light will light, and the EIS will also notify me through thresholds that I've set in the monitoring system. I like it this way, because when I'm flying it doesn't bother me (unless it needs to) and when the switch is on but the engine isn't running, it reminds me that I'm discharging the battery.
There are also holes for other LEDs above each switch. I plan to install "bicolor" LEDs in these locations, which will be green during normal "on" operation, and will flash red when the breaker is tripped. The big blank spot over the radios is for whatever huge display GPS they're selling when I finally get my 40 hours flown off.
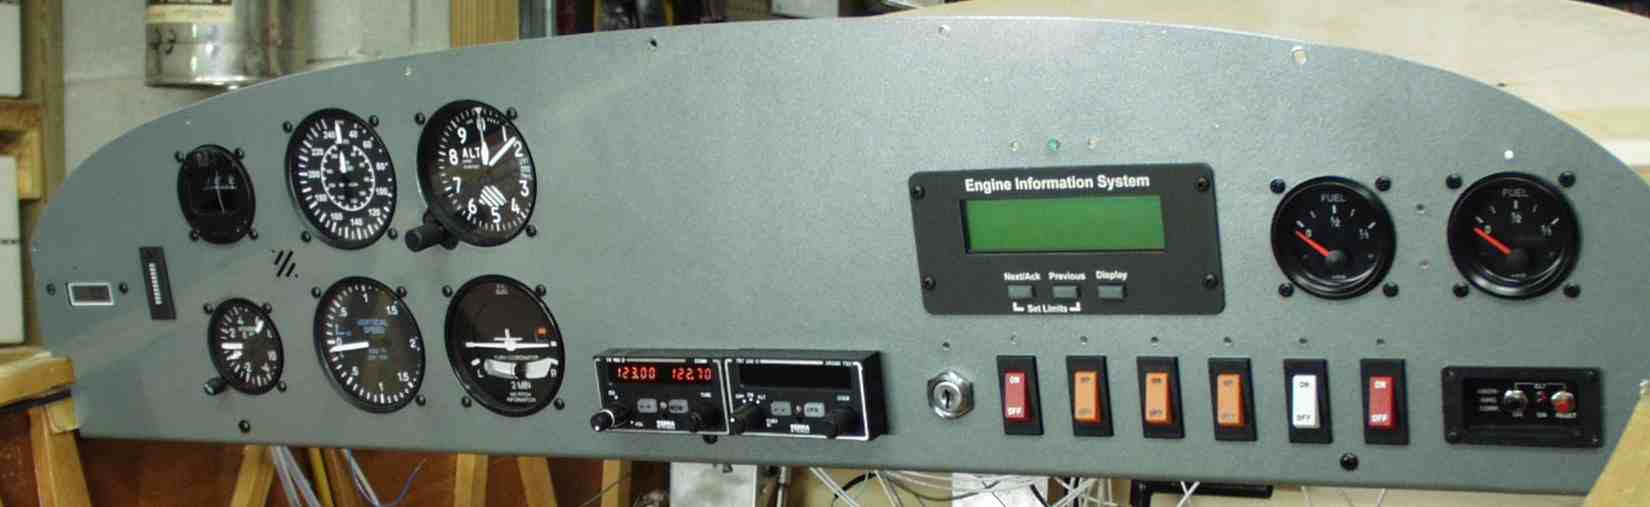
In the center of the panel is an Airmap 1000 GPS, which has now become obsolete because Lowrance stopped supporting it with Jeppessen database updates. Below that is an ICOM A200 radio, which works fine and is about as inexpensive as you can find in a panel-mounted radio. I was forced to buy this after the Terra radio became unintelligible within 2-3 miles of an airport due to a common over-modulation issue that is unrepairable. Two strikes against Terra! Nobody else sells half-width radios or transponders, hence the full width ICOM and the 2.25" Becker. Next time I'll simply use 2.25", which gives me more versatility in arranging instruments and avionics.
Below the radio is a 12V cigarette lighter adapter, which I use to charge my cellphone while at OSH and SNF. It's connected directly to the battery, so it works when the plane is turned off. Past that (under the panel, and not-visible) is a 115Vac inverter, which I use to power my laptop while flying. To the right of the GPS is the intercom volume control, and to the right of that is the Grand Rapids EIS. It's a wonderful device that I highly recommend. To the right of that is the air/fuel meter, moved from left to right because the left tank fuel gauge has never worked, and I needed a place for the transponder. To the right of the air/fuel meter is the VDO header tank fuel gauge, which is very accurate and has been trouble free. Below the fuel gauge is the ELT remote panel, and to its left are the breakers and ignition switch.
Return to Mark Langford's KR2S Construction.
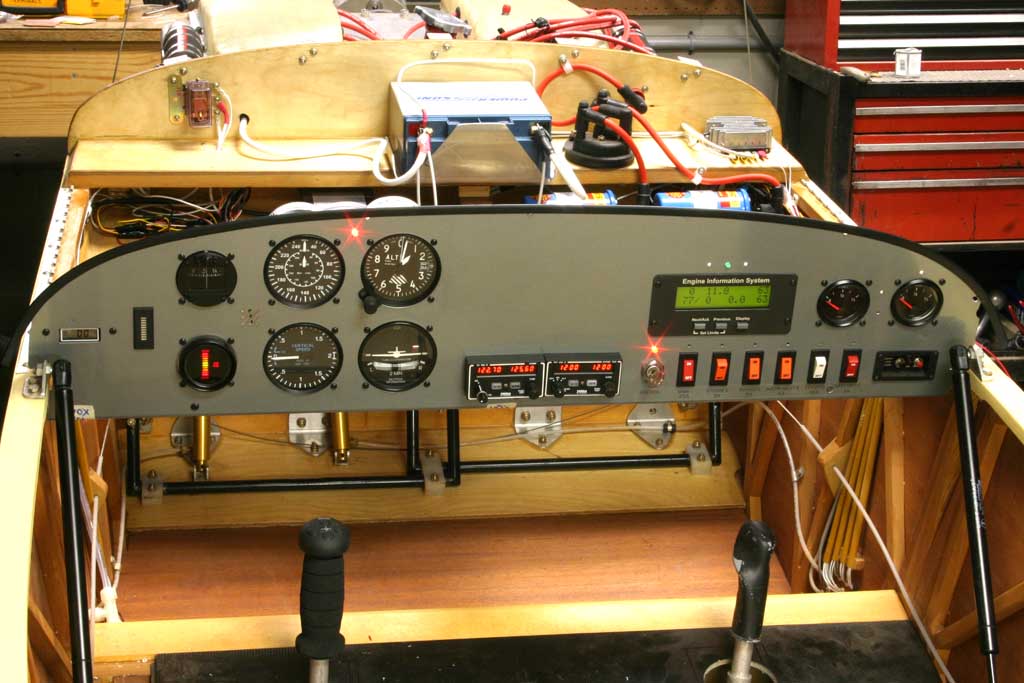
- Here's the panel, almost finished ( at least that's what I thought in 2004!). The bright light right in front of the pilot is the EIS warning light. This light flashes whenever there's a problem with one of the monitored systems, and then goes solid after you "acknowledge" the problem, until the problem goes away. The EIS comes with a big ugly incandescent light, which I replaced with this 5mm diameter LED (Hosfelt #25-405) that puts out a blinding 8000mcd (8 candlepower). These have to be wired in series with a 1/4 watt 470 ohm resistor to keep from instantly frying them. The EIS is programmed and ready to go. In this photo, it's showing an RPM of zero, voltage of 11.8V, exhaust temp of 63 degrees (thermocouple reference need to be tweaked by 9 degrees), oil temp 77 (3 degrees high), oil pressure zero, fuel pressure 0.0 (it's normally about 6.1 psi when the electric pump is on but the engine's not running) and cylinder head temp of 63 degrees. 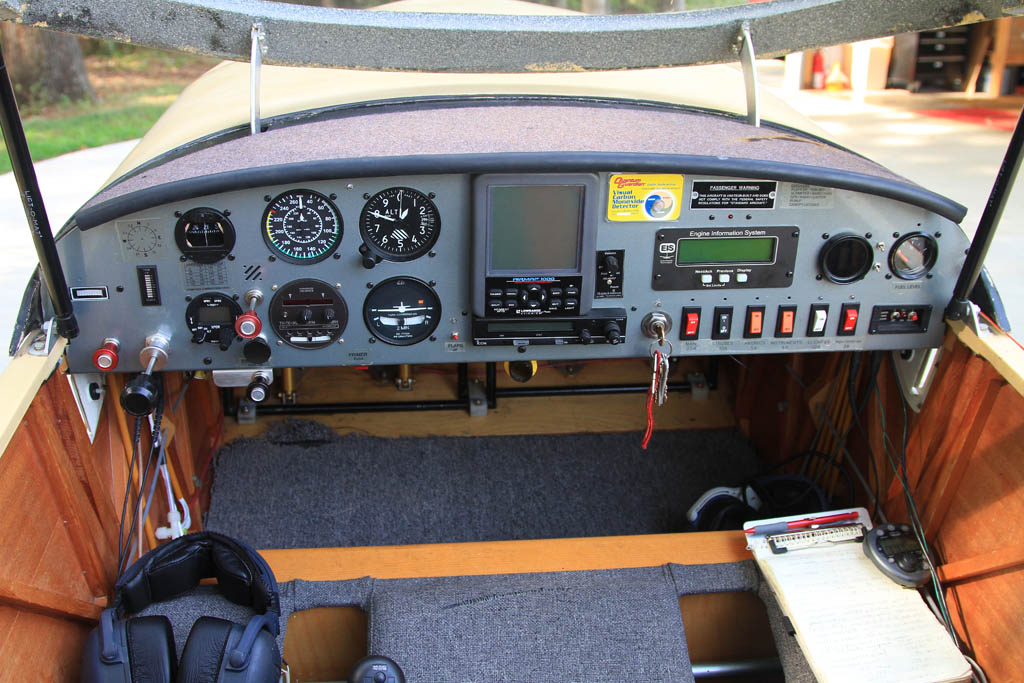
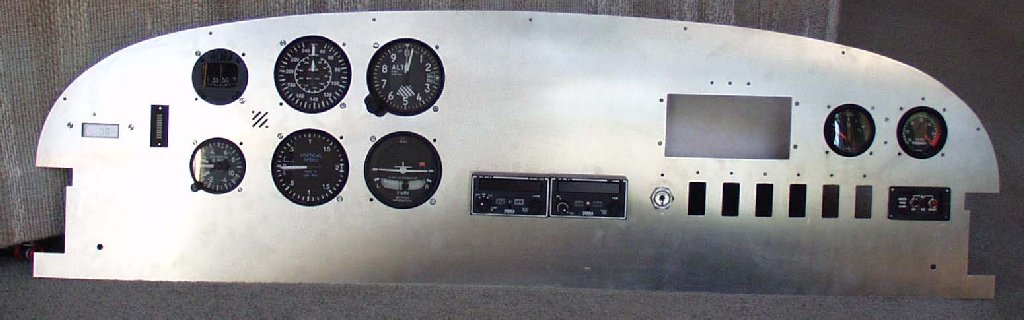
Here's the panel as of summer of 2010. The GPS in the middle is an Airmap 1000. Starting at the left, the Tiny Tach is gone...the battery in the first one croaked before I ever flew, the second one never worked at all, and when I finally got the third one working correctly by shielding the pickup wire with grounded aluminum foil, it only lasted a few more months before the battery died. Since that was my third one, I gave up and used the EIS tach instead. You'd think that'd be a hassle since the EIS is on the other side of the panel, but I quickly got used to it and it's not a bother at all now. Mixture and throttle knobs (far left) have been added, and the mixture meter (which was conveniently postioned next to the mixture knob) has been replaced by a Becker 2.25" diameter transponder. That's because the Terra croaked after 200 hours or so of flying. To the right of the transponder is the ram air knob, and carb heat below that. Hanging on the bracket is cabin heat. Note that the Falcon airspeed indicator has been replaced by a Century model, and the vertical speed is replaced by a wing leveler. The Falcon turn and bank indicator started out making a lot of electrical interference, which required the addition of a filter behind the panel. Now the bearings are making a lot of noise, and I don't expect it to last much longer. The red button you see below the T&B is my primer button, which operates a solenoid that allows the pressurized fuel to flow through 1/8" lines, one to each intake manifold. This is required to get an Ellison-carbed engine to start, and has proven that it can keep the engine running in a dire emergency such as vapor lock. The red switch to the left of the T&B is the flap switch, which is momentary down and a hard connection at the top. Travel is controlled by a limit switch going up, and the linear actuator just spins freely when the max travel is exceeded.