
created Feb 14, 2005, updated fuel pump relay part number info January, 2014
My fuel system currently consists of two 8 gallon wing tanks, although I'll add another wing tank later. The pilot's side tank is an auxilliary tank, and the passenger side is the "main" tank, complete with internal "header". The header tank is just a partitioned part of the main tank, with piano hinges over the baffle holes that act as one way fuel valves. This keeps the fuel outlet submerged in fuel even when the plane is uncoordinated. The fuel return line dumps excess return fuel from the carb back into the top of this header chamber. The return line was originally installed with the thought that I'd use fuel injection, but now it serves as a means to prevent the possibility of vapor lock, by continually circulating the fuel back to the fuel tank, rather than letting it cook out in the engine compartment and turn to vapor. Early tests revealed vapor lock problems after extended idling, so I took advantage of the return line to eliminate the possiblity of vapor lock...and it works. For more details on the wing tank construction, see my stub wing contstruction details.
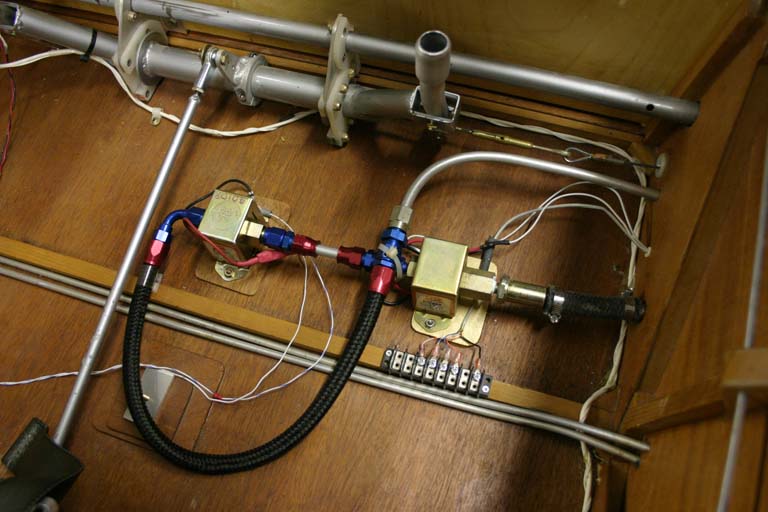
The fuel exits the main tank through a filter screen, and then a 40 micron filter on the way to a Facet 40108, which has a check valve and no anti-siphon valve. For more info on Facet pumps, see the Facet-Purolator Fuel pump data page, which lists all "cube" pumps and their characteristics. These pumps are very reliable, and I've been running one in my Karmann Ghia since the late seventies with no problem. When there is no power applied, the little check valve ball is free to float around, and the passage is open. There's another pump just like it a little further down the line, so if the first one fails or loses power, the second one can take over with the flip of a switch (see more on that below). Only one of these is run at a time, although I have run them both at the same time and can't tell the difference other than a slightly higher pressure and richer mixture. What looks like a "cross" coming out of the first pump is not an intersection, but where I went from an elbow with the original one pump setup to an exit to the other pump. What I'm saying is that everything you see here is inline, with no tees or crosses, so this photo is a little misleading if you don't understand that there are two lines merely running close together (and tie wraped together) rather than a connection there. The loose wires that you see in the photo were secured after I took the picture.
A 3/8" aluminum tube then runs out to the engine compartment, through an Earls filter, and then to an electric primer solenoid (on the left, with copper tubing running out of it). The aluminum tube you see in this photo is a "draft tube" for oil blowby, and is just thrown in there at the moment, rather than properly secured. Next is an AN-6 tee with a VDO oil pressure sensor, and then to another tee where most of the fuel goes to the carb, and some returns to the tank.
The "main" fuel filter is the bulge in the firesleeve to the left of the picture. The plastic line from the intake manifold leads to a manifold pressure transducer for the EIS, and it now has a clamp comprised of safety wire. I have no gascolator, but I do have sump drains in each wing tank to take care of water.
The main (passenger) tank is vented back to the auxillary (pilot side) tank, which is then vented to a forward facing pitot tube. This way if I pump too much fuel into the main tank, the overflow returns to the aux tank, rather than overboard. All (both) of my tanks are located in the wings. No fuel storage in the fuselage, thank you.
The "auxillary tank" is in the pilot's stub wing, and holds about 8 gallons.
I use fuel transfer from this tank to the main tank as a primitive kind of aileron trim. Fuel is transfered by a DPDT (double pole double throw) switch which powers another facet fuel transfer pump that's located between the fuel tank and the fuselage (see details on the tanks at the link at the bottom of this page). The pump only draws .7 amps, so it doesn't have to be a giant heavy duty switch. The other pole of the switch will eventually power a flashing green LED that will let you know the fuel is transfering. There's a "one shot" timer in the circuit between the switch and the pump, so the pump only runs for two minutes and then shuts off automatically. That sends about two gallons to the main tank. When it's done, the timer will shut the pump off (even if the switch is on) until it's switched off and back on again. This particular timer is an Amperite 12D1-100SST2 that I bought from Newark for $26. The timer is adjustable by installing different resistors of a certain value between two of the terminals, or even a pot if you're really a stickler. A one mega-ohm resistor gives about two minutes before the pump shuts off.
I don't have a fuel tank selector valve. This system doesn't need one, and without the valve, I'll never have fuel starvation problems because the valve is in the wrong position. There's also a " level low" warning switch in the header tank, which runs a super bright red LED on the panel.
Also, there are no shutoff valves in the system. That may not sit well with you, but it was intentional on my part. If I have a valve that can be turned off, it's just matter of time before I try to fly with it off, and we know that will not be a good thing. Not having that valve eliminates that problem, although you could argue that for a forced landing in a field I should have one. Chances are that if I had one, I'd be too busy to remember to shut it off anyway. All of my fuel is in the stub wings, outside the fuselage, except what's mounted to the firewall. The tanks are mounted between the two spars, which is a very sturdy piece of real estate. We all have our comfort levels, and I'm comfortable with this. None of my four cars has a fuel shutoff valve either. A shutoff valve in the cockpit means fuel in the cockpit, extra weight, the potential for a leak, and the potential to leave it in the wrong position. Don't let me dissuade you from having a shutoff valve in your plane, but save your breath trying to convince me I need one.
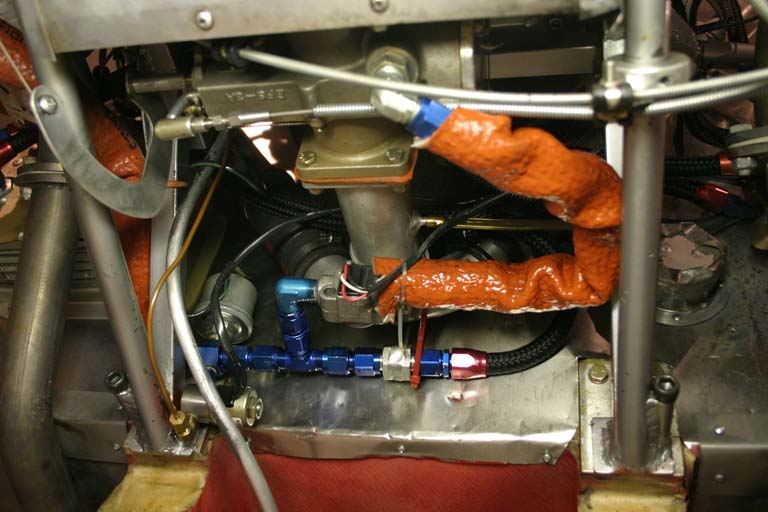
I cobbled up my own "bypass" orifice out of two Earls AN "weldable" fittings (#997106). First I drilled one of them out to 5/16", 3/8" deep (from the big end) and then pressed (tapped with a hammer) a Holley 45 main jet into the hole.
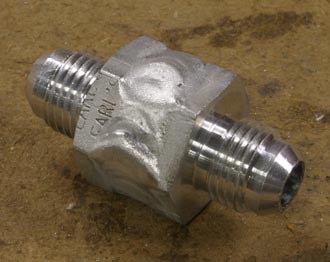
Then I just welded the two halves together, and now I have a $12 bypass that weighs 2/3 ounce. This thing works perfectly. When the engine is idling, the fuel circulates back to the tank, keeping it cool, and the fuel pressure drops from the previous 6 psi at idle, to 4 psi, yet still retains the 3 psi at wide open throttle, which is right in the middle of the operating range of the Ellison. It even seems to help keep the mixture the same from idle to WOT by minimizing the pressure differential.
I almost have a completely redundant fuel system here. My fuel pumps AND my ignition coils are connected through a military grade DPDT switch (T7-231B1, or AS&S #11-00763), to two separate batteries, which means I can flip one switch and swap out almost my entire ignition system (except spark plugs and wires, and I have SIX of each), fuel system, AND electrical system instantly if I have problems. That way if the engine still doesn't work, I can check for carb ice and then give up on the restart (it's something out of my control anyway), and immediately concentrate on flying the plane to a landing spot.
The only drawback to this system is that you have to be sure that your return line is just as secure as the supply line, because now you've got twice as much line (and an extra fitting or two) that can concievably be cut or come loose. But then that's no different from the supply line...just a little more of it.
The "carburetor" (Ellison calls it a throttle body injector).
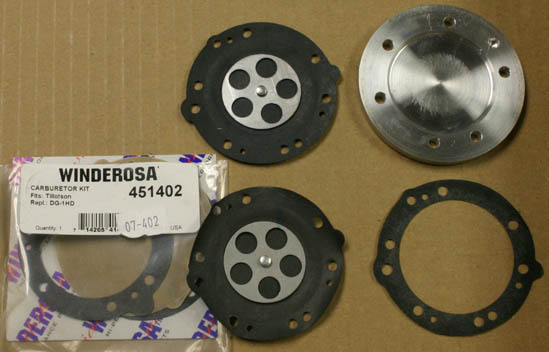
According to Ellison's website, their EFS-3A is tested on 100LL fuel, not auto fuel, so auto fuel is not recommended. I now have over 500 hours on this engine running auto fuel, and have had no problems. After doing the math on the difference between the price of 100LL and auto fuel, it became clear to me that I could buy a new carb every 100 hours or so and still be ahead of the game, if auto fuel really WAS a problem. Along the way I learned that the Ellison's pressure regulator diaphragm is just a Tillotson DG-1HD diaphragm, which is available for about $4-8 from the snowmobiler parts community. I'm not sure I'd recommend this particular kit that I bought, as the center stamped steel part was not deburred, although my guess is that it would make no difference in operation. I know a guy who's had an Ellison diaphragm soaking in E-85 (85% ethanol, 15% auto fuel, AND another one soaking in pure 87 octane auto fuel. They've been there for about five years now, and still show no signs of wrinkling or deterioration. [The replacement gasket for the EFS-2 is the Tillotson DG-3HL.]
At about 130 hours on my engine (600 gallons of auto fuel later), my engine developed what I thought were symptoms of water in the fuel (a sudden "miss" while in flight). I drained and flushed my entire fuel system with methyl alcohol, but kept the methanol out of the carb by draining the system through the carb inlet hose. I didn't find a single drop of water or any debris of any kind (other than a tad of hose braid fuzz in the fuel filters).
I then disassembled the Ellison diaphragm to check for water, and blew it out with air just to clean things up. The diaphragm still looked absolutely new, so I've reinstalled it to "continue the autofuel test". I have a Tillotson diaphragm on hand, and they are a perfect match (Tillotson on top, Ellison below). Given the condition of my diaphragm, and since snowmobiles use auto fuel, I don't expect to ever have to replace it.
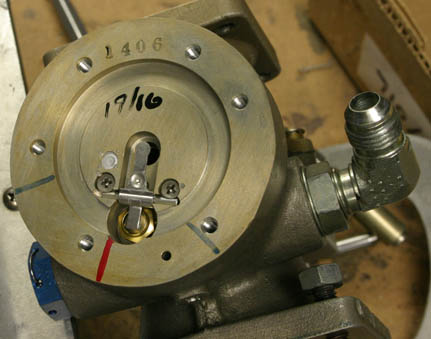
Here's what's under the diaphragm. Just a spring loaded lever controlling the inlet needle valve via signal from the diaphgram's center "piston". The resulting fuel pressure (which I think is now regulated at something like 1.5 psi) exits the hole in the middle, which connects to the spray bar in the carb throat.
See more info on the system airbox/carb heat installation, see Airbox/Carb Heat...and there's also more info on the fuel tanks at Wing Tank Construction...
Link to Facet Fuel pump data page which lists all "cube" pumps and their characteristics
Something I'll add eventually is a fuel pump relay to kill the pump in case of a crash. This relay was installed in millions of early Rabbits, Jettas, Porches, and Audis...those with "K-Jetronic" injection. It only enables the fuel pump to run when the starter is engaged or when it's receiving an ignition signal from the coil (same as a tach signal). This way, if you crash and the engine quits, the fuel pump shuts off. But if the engine quits on takeoff or during flight, a restart gets it going again. It's automatic, so there's no thinking required. And that's a good thing...because I can tell you...when the prop stops on takeoff, you may not have time or the attention span to shut the fuel valve off, because there will be other things on your mind, like "where am I going to put this thing?" This relay does the thinking for you.
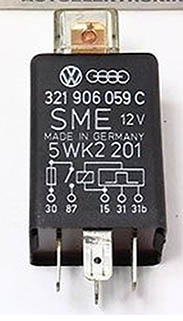
It was originally made by Bosch or Hella (more than likely), and the part number is 321 906 05C. You can leave off the C and take your pick of the various versions...I think the latest is H. They're available on the internet for as little as $20 with free shipping. I'll bet if you walked into a VW dealer and asked for a fuel pump relay for any early water-cooled VW, you'd have the proper piece, but you'd pay a lot more! It has a replaceable 16 amp fuse built into the top of it, so that gives you an idea of the derating you'd have using this thing, considering the Facet burns about an amp.
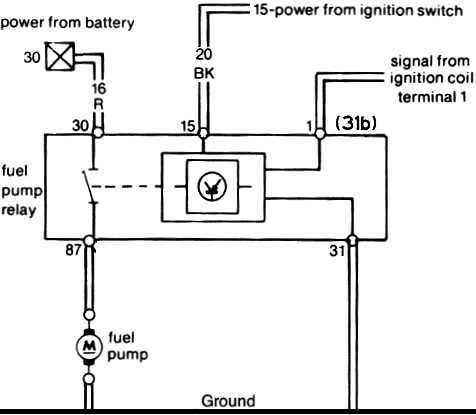
Here's the schematic for this thing. It has two phases, the first of which is operation anytime the starter is energized (terminal 15), and terminal 31b is the signal from the ignition coil, the negative terminal (same as tach). It keeps the engine running once it's started, as long as the coil is firing the plugs.
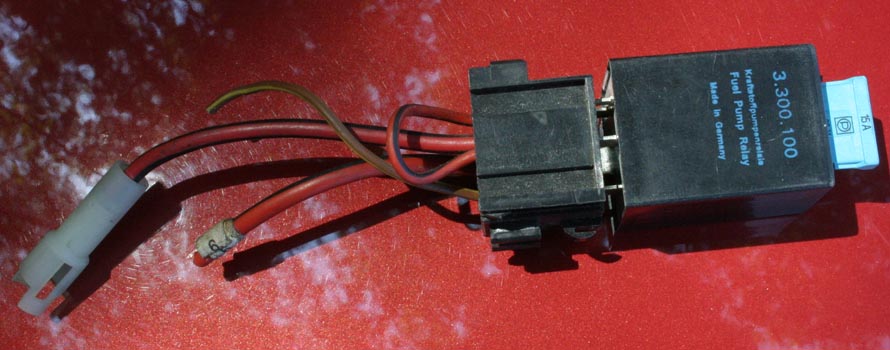
This one is a 3.300.100, but this part number isn't a VW, Bosch, or Hella number, it's an aftermarket part. I got it and the wiring harness for free from the local VW aftermarket emporium by cutting it out of a junk Jetta of late seventies vintage. The size of the wire coming out of the relay block gives you another indication of how stout this relay is. Apparently this one and even the 3.300.230, are direct replacements also.
I doubt anybody else is flying behind one, unless he's a former VW mechanic like me. I'll install mine in the next few weeks and begin the "flight testing" process, but I have no doubt that it'll work fine. If not, my DPDT fuel/ignition switch will bypass it quickly.
VAPOR LOCK - About two years ago on one of the hottest days of the summer, I flew down to my father's farm for a visit. I landed at the grass field, had lunch, spent a few good hours with my father and brother, and then started home. Well I'd left my KR hat back at the house, so my brother went back to retrieve it. I figured he'd be right back and just left the engine idling, because it was about 98 degrees and the breeze from the prop was appreciated. It actually took him about 15 minutes to get back because it was in a truck that was gone to the barn, and it took a while to catch up with it. I noticed it was getting a little warm, so I switched the plane off for the last few minutes of waiting. That was a mistake, because it allowed all that heat to soak into the engine compartment (and the carburetor).
The Ellison carb has a 3" round aluminum disk on the side that functions as the cover for the pressure regulator (see above). On my engine it's about a foot away from the exhaust, so I hadn't bothered to shield it. My brother and my hat showed up after a few minutes of heat soaking, and off I went. On climbout I noticed it was't exactly jumping into the sky, but figured the heat and density altitude had a lot to do with that, but while checking the mixture meter I noticed it was down in the red....running too lean. That didn't make any sense, so I started checking the mixture meter and knob, throttle, and everything else I could think of including swapping out the ignition and fuel system with my magic DPDT switch, but continued to climb out towards Montgomery. I guess I didn't think it was bad enough to worry about. A few minutes later the engine started missing a little, and a glance at the mixture meter showed a very lean condition...just one bar showing on the bottom, and here I am at full throttle climbing out! So I reduced throttle, cancelled the climb, and started wondering how I was going to get more fuel into the engine...and turned to toward the Montgomery airport, and switched to their tower frequency. This was not looking good.
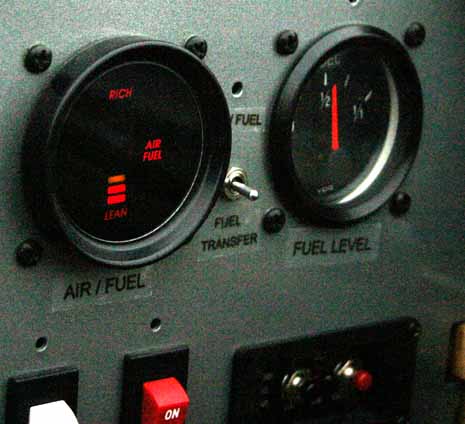
The first thing that popped into my mind was the electric primer button. I pushed the button on and held it for about five seconds, and watched the mixture meter peg in the "rich" direction. I was off to a good start! Then I started pulsing the button, and eventually settled on about a third of a second on, a second off, and the mixture meter stayed pretty close to centered. I continued to do that while leveled off, and after a few minutes of better engine cooling due to the lowered power and level climb rate, the mixture meter started returning to it's normal reading, and then even richer. I was able to stop my priming routine, climb to altitude, and continue on the way home. Since that flight, I've installed a carburetor throat temperature probe, as well as an "under cowl" temperature probe. During flight, the under cowl temp is only about 20F warmer than the outside temperature. But with the plane parked and the engine off, the temperature climbs to levels that can easily cause vapor locking. Be particularly attentive to the possibility of vapor lock during refueling during hot summer days, especially if you have to sit at the end of the runway waiting on other planes to takeoff or land. I've discovered that running the engine up to 1200 rpm or so will start bringing temperatures down, as the propstream cools things off under the cowling.
April, 2009 - My current engine is running a 9.4:1 compression ratio, which I will admit is pushing the limit when burning auto fuel, which I do about 97% of the time (I only burn 100LL when I'm "on the road" and can't get 93 octane autofuel). Twice I've had issues with detonation on takeoff, and both times I attribute it to somebody along the chain substituting 87 octane for the 93. For that reason, 8.5:1 would be safer, or mixing 1 part 100LL with 2 parts 87 octane autofuel (that would give you 93 octane, since 100LL is roughly 105 octane on the automotive scale). Having said that, the main downside of 105LL is the lead deposits that will coat the head and valves, eventually leading to premature valve sealing problems.
Contact Mark Langford (if you must) at N56ML "at" hiwaay.net (replace the "at" with @)
Return to Mark Langford's N56ML website