Mark Langford's KR2S Project
Wing Tank Construction
originally written December, 1996, updated July, 2004
I should mention that the RR plans call for wing tanks to be mounted in the outer wings, rather than the stub wings. I chose to put them in the stub wings to minimize the constant lateral CG adjustments necessary with fuel burning off from tanks further out in the wings, and to eliminate that fuel fitting connection between the outer wings and stub wings. If you are planning to build a tricycle geared plane using Diehl's gear brackets, you'll have a hard time making stubwing tanks worth the effort, and should probably put them in the outer wing. Another option is Grove gear or something similar, which attaches to the spar from a much thinner bracket.
There might be one benefit to having the fuel in the outer wings, which is that in a severe crash the wings might get sheared off and end up somewhere other than with you, but my guess is they'd probably rupture in the process. Stub wing tanks are fairly well protected though. Another advantage to tanks in the outboard wings is that they have dihedral, helping the fuel to settle at the inboard end of the tank, a natural sump area. Stub wings have no dihedral, unless you do the "bent spar" thing, where you bend your spars (by laminating quarter inch strips together) up just outside the fuselage. Were I to build mine again, that's exactly how I'd do it, and I'd use something like Grove's spring gear, and add a few inches of height to the KR's stance for improved landing properties and increased prop clearance.

Pilot's side wing tank will act as an auxillary tank, whose sole purpose is to refill the right tank. The transfer fuel pump is mounted between fuselage and wing stub, with access from below the plane via the fillet, while the main pump is located under the passenger's seat.

The right (passenger's side) tank is the main tank. Note that the compartment closest to the fuselage will serve as an internal header tank. It is separated from the main tank by baffles, except for a one way door (below sending unit in this picture). The trap door allows fuel into the header tank but not out. It is simply a piano hinge hung over the hole such that it only opens to the inside. There are also other vents and bleed holes between the compartments which are "healed" (foam sealed) with micro or short lengths of 3/4" thin wall aluminum tubing. The baffle keeps fuel from starving the fuel injection pickup, and also functions as a sending unit mount. The sending unit is a "universal" VDO sender (part number 226-001) that originally weighed 19.1 oz, now down to 2.3 oz after a little "dieting".
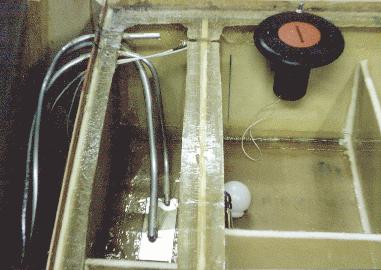
The "internal header" tank is to the left. The aluminum lines are floxed into position thru the highest point of the left side of the tank, so if leaks develop, they will rarely be directly exposed to fuel. The large 3/8" line is a fuel injection return line. It empties onto an aluminum plate which prevents erosion of the tank bottom. Bosch CIS injection (early VW Rabbits) constantly recirculates it's fuel (by nature of the control/system pressure design) which prevents vapor lock entirely. The smaller 1/4" line is the inlet from the auxillary tank in the left wing. The 1/4" line at the top is the vent/overflow back to the auxillary tank, which is vented with a 3/8" line. This way, if I pump too much fuel into the tank, the overflow will simply go back to the auxillary tank.
NOTE: As of mid 2000, I've decided to go with a carburetor rather than CIS injection. See my CIS injection page for more details on how I arrived at that decision.
ANOTHER NOTE, 2007: If I could do it over again, fuel connections would be cut out a round aluminum plate from 3/8"
aluminum plate, drilled and tapped for a 3/8" NPT hole in the middle, and build this into
the structure as you build the tanks. Cut out the foam, substitute the
aluminum block, and glass right over it on the inside, then drill a hole
through it later from the outside (and vacuum out the chips). Put several
layers of glass around these to reinforce them so you can install an AN-6
fitting later without tearing them out. Drains can be done the same way. I
tried just floxing aluminum tubing into the top, and one of my tanks leaks slightly
when totally full because I didn't do a perfect job.
Also, don't use the black plastic fillers that I used. Wicks and AS&S both sell a
large plastic (white, I think) filler with a knurled aluminum collar which
you flox into the tank, as well as other large diameter filler cap/neck combinations. That way you can see how much fuel you have while
filling it. It's also big enough that a child's hand could
reach in there to jiggle a stuck fuel sender or something. My small black plastic filler neck that I used leaves fuel level a mystery until
the fuel spills out the top while filling. (end of 2007 "afterthought")
I finally received the missing Vinyl Ester resin from AS&S (after almost three months!), but by then the University of Illinois team had signed on to design the new KR2S airfoil so I was on hold again (fortunately). After the AS5046 was designed, I plotted out a 47.25" set that would fit my existing spars and cut new rib templates to fit over my old ones (except the trailing edge ones, which were removed and replaced).
For those planning on using wing tanks, the general rule with the RAF48 is that each inch of wing tank will get you a half a gallon of fuel. With the AS5048 airfoil, you'll get about .6 gallons per inch. This means even with the RAF48, you can easily get 24 gallons of fuel into your two stub wings, IF you don't widen the fuselage and use up some of that stub wing.
The biggest problem with wing tanks is that a proper sump will cost you a lot of tank volume. I think my "internal header tank" concept will offer the best compromise. When in level flight, the lowest point of the airfoil forms the sump, and a baffle right behind it traps fuel in the small header for nose high conditions such as landing when fuel is low. During turns, keeping the ball centered will keep the fuel where it's supposed to be, and if that doesn't work, the aluminum hinge "trap door" will certainly help. But make no mistake, fuel starvation is more likely with wing tanks than with a properly sumped header tank.
Another option is a small 2 or 3 gallon header tank, made from something like a large diameter thin-wall aluminum tube, and mounted behind the instrument panel and as high as possible. This tank would be fed by the wing tanks by electric fuel pumps which are triggered by a fuel level switch. The outlet would then feed the mechanical pump mounted on the engine. I may still do this, but it's another level of complexity, with a new point of failure. And if I ever feel like 19 gallons of fuel isn't enough (since my Corvair will burn 6.5 gallons per hour) I may add an official fuel cell behind the seat. They are cheap, and can be bought from Summit Racing (see the fuel cell page from their catalog).
Another thing I would probably do differently, is I'd take a good long look at making the tank from aluminum. I've heard too many stories of composite wing tanks leaking from "day one". Several guys have had aluminum tanks made up for $100 to $200, and that sounds like a bargain to me. The beauty of a tank that is just plopped into place and bolted down is that you can test it for leaks BEFORE you close the wing, sand, and paint the airplane. Of course you could also do this with a composite tank, and prove it doesn't leak BEFORE you seal your wing up. Either way works.
Many more details of the actual construction of the wing tanks is available about halfway down my Stub Wing Construction page.
Update-July 2004 I've had my main and auxillary tanks filled for about three months now, and not one drop has leaked out! I think the key to building leak-proof tanks is doing it in two or three separate layups, where each layup can cover and seal pinholes from the previous layup. And use lots of epoxy. A little extra epoxy here can save the weight (and time) of doing a repair later.
I've now tested my fuel system, and have come to the following conclusions. My main (right tank) holds exactly 8 gallons from full to empty (in flying attitude) and the left (aux) tank holds the same, for a total of 16 gallons. I have about .4 gallons of unusable fuel in each tank (not counted in the 16 gallons), and when you consider the 10% "air space" at the top of the tank, that's what my "19 gallon" fuel tanks became.
The Facet fuel pump delivers .67 gallons per minute (40 gph) through the 3/8" line with no restriction (carburetor) on the end. With carb installed, fuel pressure is 6 psi, as measured by the EIS pressure sensor. Venting works great, as I emptied both tanks in 24 minutes with the caps sealed tightly. Not one drop leaked out from anywhere, including the vent line. I'm working on a simple 555 timer circuit that will run the transfer pump for 6 minutes, which will transfer half the aux tank to the main tank with one bump of the switch. It will be activated with an off/on/momentary switch so I can switch it off before the timer is finished if the tank runs dry (it's loud enough to hear while flying, I'll bet).
You might notice that I left about 3" of wing tank volume "on the table" for no good reason by leaving a gap between wing tank and fuselage, so I could have easily gotten another 15% tank volume there, and if I'd used the AS5048 airfoil, I could have had another 20% on top of that, for a grand total of 22 gallons of useable fuel. Don't make the same mistake I did! When I originally designed these tanks I was going to use a VW engine which burns less fuel, and I didn't want to limit my gross weight by putting too much fuel in it. Now I'm running a thirstier (but more powerful) Corvair, and I know I'm going to set my gross weight higher than 980 pounds, so if I were going to do it again, I'd have every bit of that 22 gallons.
Update, December 2007 - I now have 560 hours on my plane, and have yet to have it stumble due to fuel problems. I've landed with a gallon of fuel in it, which is still 20 minutes of reserve (that was stretching it), without so much as a hiccup. At "ecomonmy cruise", which is burning about 3.2 gallons/hour at 9500' or 10,500', I'm still doing about 145 mph true airspeed, so my 16 gallons will get me 4.5 hours of flying time, not counting the 30 minute reserve.
I'm pretty happy with my fuel system, but may still add about 4 gallons in the form of a 4" diameter aluminum tube in the outboard right wing. This will help me counter the Corvair propwash and eliminate the resulting "heavy" left wing. Although the left tank drains to the right one by itself, it can't keep up with full throttle, so the auxillary pump is still necessary towards the end of the flight. I've installed an off the shelf timer that runs for 2 minutes per activation.
There's more on the rest of the fuel system (the big picture) at http://www.n56ml.com/fuel/index.html
Return to the Mark Langford's Project