iFly UPATE - October 2016:
I've put almost 300 hours on the panel now, and I really like the iFly 720 user interface. It's WAY more intuitive and user friendly than the iEFIS (don't get me started on that) and is also more intuitive to use than Foreflight. But after about 100 hours of flying, my iFly 720 "bricked" itself during a routine OS update, requiring me to overnight it to AdventurePilot for an emergency repair (this happened four days before a planned flight to Chino, CA).
Two years later, at about 200 hours of use, the touch screen went south, to the extent that the unit was unusable, requiring another repair, which cost me about $140. This is not an uncommon issue either, as I know several folks who've had the same problem. When I got it back, my non-glare screen protector was missing (it went with the touch screen) and the screen was so highly reflective I could barely see it. So then I had to order another non-glare sheet and cut it to fit, since iFly doesn't even sell one to fit their unit! Yes, whine, whine, whine!
I've recently built a dual frequency Stratux ADS-b unit. It works great with my iPhone and iPad, but NOT with the iFly 720. Hmmmm. I've spent at least ten hours screwing around with this issue, including reloading the OS, but to no avail. The symptom is that although the Stratux is "connected" to the unit in the WIFI NETWORK SETUP screen and shows the Stratux's IP address (correctly found through DHCP, so the iFly unit is certainly communicating with the Stratux), there is no ADSB connection once running the NAVIGATION app. In NAVIGATION, when I go to INFO and CONNECTED DEVICES, the Stratux/Flightbox shows as "chosen", but the note below it says "Selected device not connected". So part of the unit thinks it's connected, and the other part thinks not.
The bottom line is that my ADSB doesn't work on this unit, all the while working fine on both iPAD and iPhone, which are happily running the iFly app and receiving and displaying ADSB data the whole time! The ADSB tower is only a few miles from both my airport and my house, so I don't have to fly to receive ADSB data...or test the iFly, but I have flown with both iPad and iFly, with the same results as I get on the ground (obviously), usually tracking 14 satellites and receiving three local ADSB towers.
I've opened a problem request with AdventurePilot, and they've had me reload the OS again, to no avail, and try a few other things, but it still shows "selected device is not connected". Given that I've never used the WiFi before (it's famously slooooow), it may not have ever worked. For $39.99, they will "evaluate and test" it for me, if I'll send both iFly720 and Stratux to them, and then will tell me how much it will cost to fix it! That was the straw that broke the camel's back...I've had enough frustration with iFly hardware, and would rather not pour more money into that little black box.
The iFly software works great on the iPad. The iPad is actually a little brighter than the iFly, and it's absolutely bomb-proof hardware by comparison. I'm using an old castoff iPad 2 that I inherited from my daughter, and despite many years of constant use and abuse, the touch screen still works great (way smoother and more predictable than the iFly), it has a huge battery with many hours of runtime, and I can run all kinds of other apps on it at the same time! If the iFly loses power for more than a few seconds, it's a 3 minute penalty before you get it back online! Also, the iFly brightness drops off quickly when viewed from the left in portrait mode, which is exactly how mine is mounted...and portrait mode only works one way, not the other...so there's no cure for that. The iPad remains bright at far greater viewing angles than the iFly. And the iPad boots in just a few seconds, as opposed to the 3 minute boot time of the iFly.
BUT, the iPad is way too large to fit in the small space left by the iFly, so I'd need an iFly Mini, which can be bought used from ebay for $125 or so. But if I have to buy something, it should be optimized for the job, so a search for "brightest tablet" turned up the Nexus 7. It's even brighter than the iFly or iPad, almost exactly the same size as the iFly 720, it's a lot faster (with a quad-core processor and 32G of RAM), and the Nexus 7 is more flexible than an iPad (at least it's not "locked"), because it runs the Android OS and applications. It's only .35" thick, so it would even look better on the panel.
So I bought a used 32G Nexus 7 for $150 from ebay, and was looking forward to using reliable hardware for my iFly software. Yes, 32GB of RAM is overkill, considering the iFly 720 uses an 8G SD card that's only half full, but it was a good deal! So I got it, installed iFly software on it, and despite what their website says, the iFly app doesn't see the ADS-b on the Android-based Nexus either, despite a clear indication that it's linked through wi-fi! Again though, it works fine on iPad and iPhone, so clearly I know how to set up the software. If there's some obscure port setting or something else I'm supposed to do (although I've tried everything available, I think), please let me know. I'll appreciate the tip, and I'll be even more irritated with Adventure Pilot for not making their instructions (or the tech support) more informative.
So then I bought an iPad 2 (again...$154 on ebay) because it fits the panel nicely in the footprint of the iFly 720. Guess what...even though it's connected through wi-fi, neither Foreflight nor iFly software will "connect" to the Stratux from within the app. Go figure. Still working on this, obviously, but at the very least, I can run either Foreflight or iFly software on a very inexpensive box with a huge battery, great readability, bulletproof touchscreen and buttons, fast processor, etc.
One problem iPads have is overheating when running full brightness continuously, especially in hot weather or direct sunlight. Mine never had that problem until I flew to OSH this summer on a record-breaking hot day, and then only when I landed for refueling and the iPad was in the sun. When I got ready for takeoff it said it needed to cool off first..."turn me off".
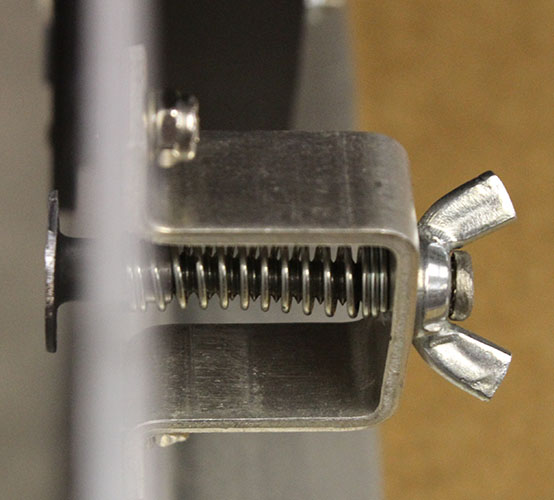
The cure for that is to direct some air on the back of the unit. I saw Bill Clapp at OSH with an iPad on the panel, and he showed me the sheet aluminum holder he'd bent up to retain the iPad, with holes drilled in the back of the bracket to allow air to circulate on the back. There was a 1" hole in the panel with a SCAT blast tube aimed at it...end of overheating problem! I'll have a huge hole in my panel when the MGL iEFIS comes out, so I can simply mount a large diameter fan to the back of the panel blowing on the back of the iPad. Also, make sure you power it with at least 2.1A of power, more if possible. I bought a 3A power supply for about $5 off ebay that will provide plenty of power.
And if the Mini croaks, to replace the it with something newer would cost peanuts compared to another iFly GPS Unit. I don't know why AdventurePilot even bothers with hardware....they should be content with the $79 annual iFly720 subscription price, and concentrate on their software, rather than dabbling with hardware that's no competition for the much larger tablet market.
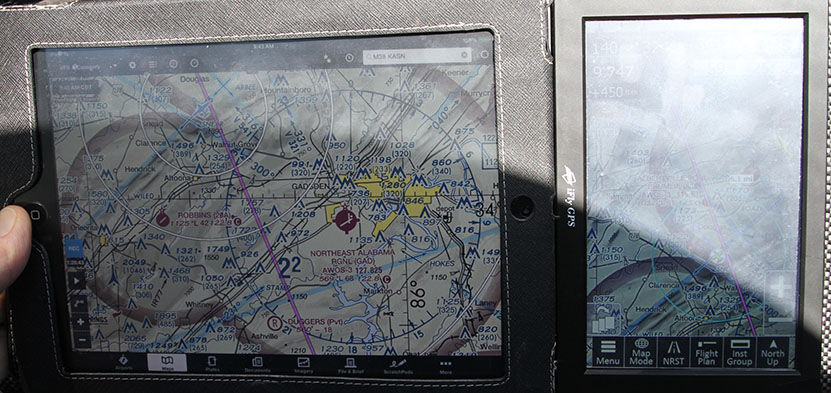
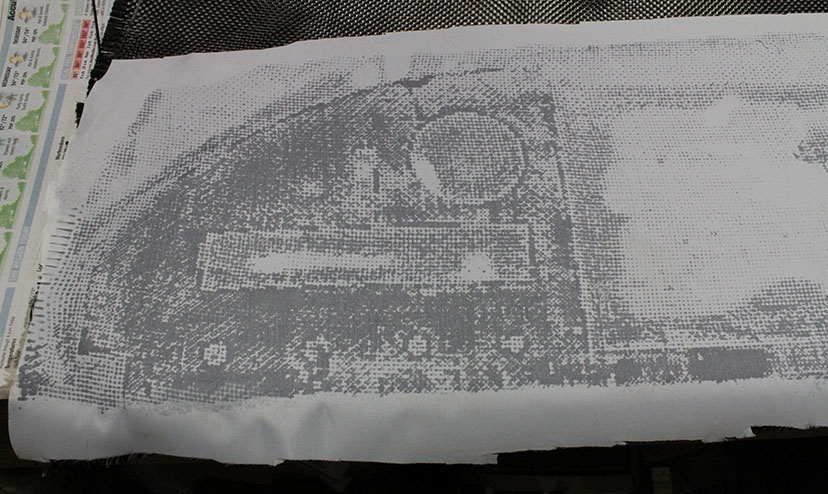
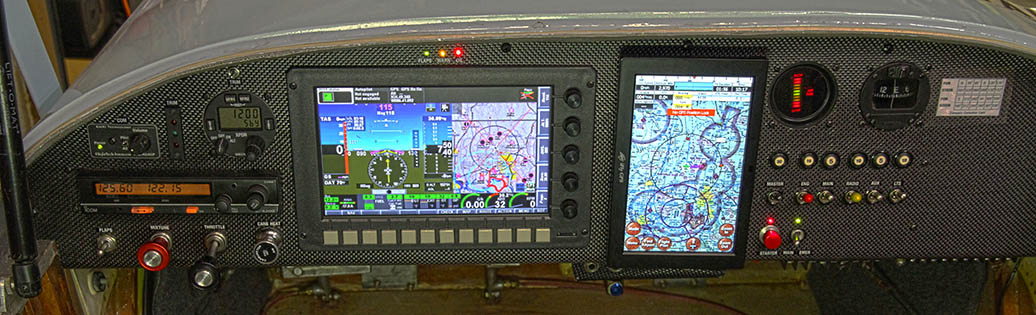
Here's an old iPad 2 running Foreflight compared to the iFly720 with identical conditions (direct sunlight from behind, with exactly the same anti-glare material applied to both screens). The iPad is the clear winner here.
Update on the iEFIS- December 2016 - After flying behind the iEFIS for two years, all I can say is that it's been an exercise in frustration. It works (when something's not dead), but it doesn't work well, the user interface is counter-intuitive, and the software interfaces (loading, updating, data recording) are confusing and user-hateful. I could write a book on this, but refuse to waste the time, so here'a a quick synopsis:
Hardware:
The iBox (brains of the system) had an issue at installation where the OAT sensor wouldn't work. This underlines the problem with an EFIS...if some little part of it doesn't work, you have to buy a WHOLE 'NUTHER BOX to fix it. It was under warranty, so MGL sent me a new one.
After putting 40 hours on the plane, two of the buttons on the main "Explorer" video screen that operate the majority of the system quit working. "First time that's happened", I'm told. So they sent me another Explorer unit. If the first one lasted 40 hours, how long will the next one last?
Then, the "new" iBox croaked (I forget what it was this time, but it was major), and they sent me another one.
Early in 2016, just after the three year warranty expired, I flew down to my father's farm. When got back in the plane to return a few hours later, the iEFIS was totally black...no sign of activity, or even life. Well, I still had the iFly on the panel, but I had to fly 250 miles with no engine information at all! Not smart, admittedly. So I called MGL and they agreed to swap it out, but when I went to swap it out, it fired right up and worked fine! I know what you're thinking...this thing had power from both main and backup batteries, and I tried them both, both on the day it happened, and the next day, and it was dead by all appearances. But before I removed it, I thought "what the heck", and flipped it on...it lit right up, and the Hobbs meter had recorded the flight back home! Go figure, but I call this "unreliable", and intermittent.
This data displayed on this thing is simply all over the place....temperatures, pressures, and things like the vertical speed jitter over an amazing range. I've sat in the hangar with nothing else on, running on an isolated backup battery, hundreds of yards from any 120V power sources, and watched the vertical speed hit over 1100 fpm...while sitting in the hangar! EGTs dance all around, sampling several times per second and hot and cold cylinders swapping places by as much as 30 degrees per second. Hmmmm... my old GRT EIS would fly along for thirty seconds without CHTs for all six cylinders changing by a single degree, or charging voltage might change by .1 volt, recording the same temps very steadily, and able to hold altitude within 10' for half a minute at a time. Just to show you how bad this iEFIS is, there's a "flight profile" page where it shows a few statistics from the previous flight, and I've seen stuff like "max fpm climb" as 21,000'/min, or something similar. I'm no longer amazed at any numbers I see from this thing. I'll post snapshots of this stuff if I ever feel like I have that kind of time to burn. I have plenty of video showing the crazy antics of the display while flying. MGL quickly pointed the finger at my alternator, so I flew with it disconnected...no change. So then the ignition system was the culprit, so I did a test where I went to 12,000' and killed the engine...there was a slight improvement, but that may have been my imagination. Then it was sensor wiring and grounding. What you should know is that I wired it with very high quality left-over Mil Std space shuttle wire...twisted pairs shielded in nickel plated copper braid, and grounded on a common end to eliminate any chance of interference, so this didn't hold water with me, although I checked and rechecked it all. Then one day I flipped on the iEFIS while I was listening to the FM radio in my hangar, and the radio instantly turned to "white noise". The iEFIS ITSELF was the source of the EMI! My iEFIS is wired on its own separate bus, and it also has its own backup battery. When I'm in the hangar I flip the backup EFIS power button and there's nothing else running but the iFIS. The temps and VSI, etc still jitter, but not quite as bad as when flying...I suspect because there's no motion or engine activity. Anything monitored like temps, VSI, etc have magnified variations when flying. It's worth noting that the rock-steady EIS (old-school engine information system from GRT that I ran on N56ML) had but one simple little ground wire to the main ground point and delivered solid numbers, but there's no end to the admonitions in the iEFIS manual regarding grounding, including conflicting information as to how to ground sensors and unit to engine block and RDAC. Eventually I hooked an oscilloscope to the bus that powers the iEFIS, in my hangar, nothing but backup power, no powered devices in the hanger (but the o-scope) and registered all kinds of AC spikes routinely around 2V, and as high as 10V on the power line between iEFIS and sealed lead acid battery. I'm just a dumb mechanical engineer, but you tell me, do you think it's the DC lead acid battery creating these random AC spikes or the iEFIS (that blanks out my FM radio)? I know which one it is! There was only one piece of MGL hardware that hadn't been replaced, so I bought a new RDAC-XT...no change. More later on this...I need a drink...but other topics will be:
Data logging (or the lack thereof) and crazy file naming convention (where all data files have the same name), same time stamp and file size for all data files, date format in a form that is difficult to search (given that there's no time stamp" etc.
Fuel level calibration is very coarse and hoaky, based on liters and very large fuel tanks (which we don't have), leading to interpolation insanity, and in the end a fuel tank level that means very little, especially if the tank isn't a uniform cross section from top to bottom.
Temperature resolutions of 1.8 degrees F (due to the core system being designed around Celsius), so it has half the resolution of most EFIS units(skips every other degree F). Not that it matters, as much as the numbers fluctuate.
Annoying little things like a software glitch that makes the machine lockup (forcing a reboot), when a common button (navigate to) is pushed.
Steam gauges, and the beauty of troubleshooting and replacing one instrument at a time, better readability, etc. Beats disabling the airplane while you send your expensive unit back to the manufacturer so he can screw you further for their lack of reliability.
Oh, and I have an iEFIS for sale....bargain price....
Return to Mark Langford's N891JF Refurb Project