Force One Prop Hub Bearing Drain
Force One Prop Hub Bearing Drain for GPASC VW Aircraft Engines
created January, 2021
I have 225 hours on N891JF since the last time I rebuilt the engine with new Revmaster heads and a newer GPASC Force One bearing. It runs great, starts immediately, and runs smoothly. But the prop hub seals, which were leak-free in the beginning, have steadily increased from a slight mist on the front of the canopy every few weeks, to becoming a real visibility issue on a two hour flight. The source of the leak was between the seals in the Force One bearing that supports the prop hub. In my head, I visualized the seals as having worn out and needing replacement, which is not trivial, as it's a 3 degree "Morse" taper that has to be pressed apart....which is easy enough if you have a hydraulic press the crankshaft out of the engine, but something that's difficult to do with any kind of puller with the crank still in the assembled engine.
Another option was to try to drain the area between the two Force One seals, as Steve Bennett had told me years ago in a phone call. At the time, the problem wasn't a big deal....just wash the canopy every few flights. But now I couldn't remember the exact details, and asked on KRnet if somebody had done it, and perhaps could provide instructions. Otherwise, it was time to tear into the engine to replace those dumb seals!
Within hours, Netherlander Marcel Driessen whipped up "how-to" directions for exactly how he'd implemented the drain, and it's an excellent description.
See http://www.krnet.org/forceoneleakfix.pdf.
I thought it was worth a try, especially as simple as the process was, so I started looking through my "small brass fitting" box to see what I had on hand. Eventually I came across a small zip-loc bag that contained two tiny fittings, connected with a piece of 1/8" ID thick wall urethane tubing. Then it came back to me....Steve Bennett had mailed me that kit back when I called him about the problem, and I already had the parts I needed! Marcel's instructions filled in the gaps (like the tiny hole at the top of the bearing to provide a "vacuum break" to allow the oil to drain), and his word that it had completely fixed the problem convinced me to see if it would work for my engine.

Next was figuring out the threads on the brass fittings, which turned out to be 5mm x 0.8mm, with a 3mm (1/8") diameter passage hole. These are not tapered threads, but straight threads, so don't get lost on that rabbit hole like I did. Our local RC model shop didn't have them, but I did find some similar ones on Amazon,
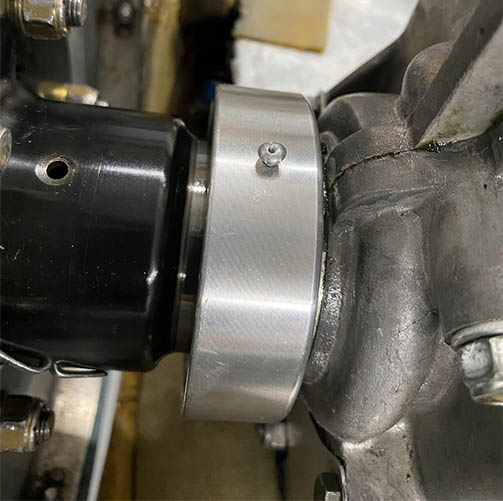
HERE. You'll also need an M5 tap (5mm x 0.8mm), and an 11/64 drill bit to make the hole before tapping (although I used a smaller #19 bit because it's easy to wallow out the hole too large, and it's just aluminum). As Marcel said, coat the bit with grease to collect the chips, and make the drilling a several step process of drilling a bit, cleaning off the grease and chips, repeat, repeat, etc. One detail I should mention about drilling this hole is that there's a pretty good bit of room for depth error....once you go through the steel seal housing there's still about 3/8" before you hit the bearing. Use a magnet to clean up, maybe even a magetized nail like I did, (although I didn't get anything from that exercise). As for the small hole at the top, I made it a using an 0.093" drill bit (about 3/32"), which looked small in the drill bit box, but looked huge on the bearing housing.
I was concerned about it becoming an oil geyser, so I devised a plug consisting of an AN-3 size rivet, about 3/8" long, which (it just happens) is 0.094" in diameter. I chose an "A" rivet rather than an "AD" rivet, because the A is softer aluminum than the AD, and would be easier to drill. Then I mounted it in a drill vise under the drill press, center punched the head, and drilled a hole all the way through it using a #56 (0.0465") drill bit. Why a #56? It meets the criteria of "tiny", and more importantly, I broke my smallest bit (a #60 at 0.040" diameter) trying to drill the first one!
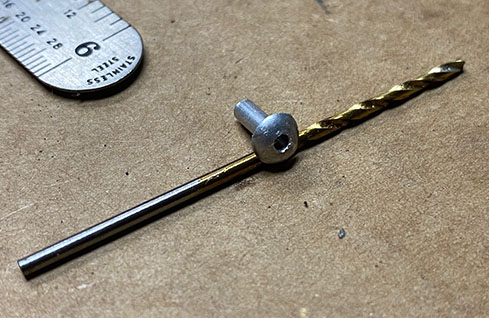
After this, I modified the drilling method to put most of the bit up into the chuck, added some cutting oil to the bit, and used light pressure and many withdrawals to clear the chips, along with more cutting oil each time. In the end, it worked out fine, and now I have a truly tiny hole, with a removable orifice that can be replaced by another undrilled rivet if I ever want to plug it or alter the hole diameter again.
The rivet is a tight fit, so I left half of it protruding so I can pull it out if I want to modify it. Yes, this is all over the top, but in retrospect, I'm glad I did it this way because otherwise I may have broken the bit off in the bearing housing, rather than in a rivet that I trashed..
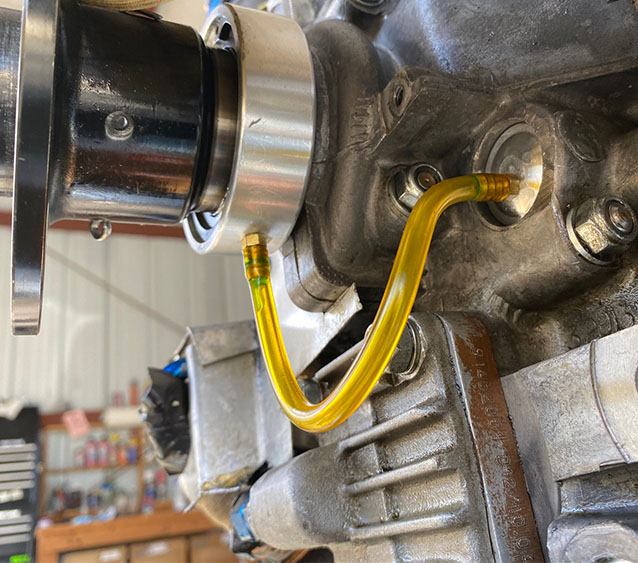
As for the tubing, there are various places to get fuel-compatible (usually polyurethane) thick-wall tubing with 1/8" inner diameter, and you only need about six inches of it. The local RC shop would probably have it also.
So how did it work out? After cleaning up the oil from the front of the engine I flew it for almost an hour, and upon landing, couldn't find any evidence at all of oil spray on the canopy, nor on the cowling or engine! There was also no leakage from the tiny hole in the top of the bearing housing, so it works as designed!
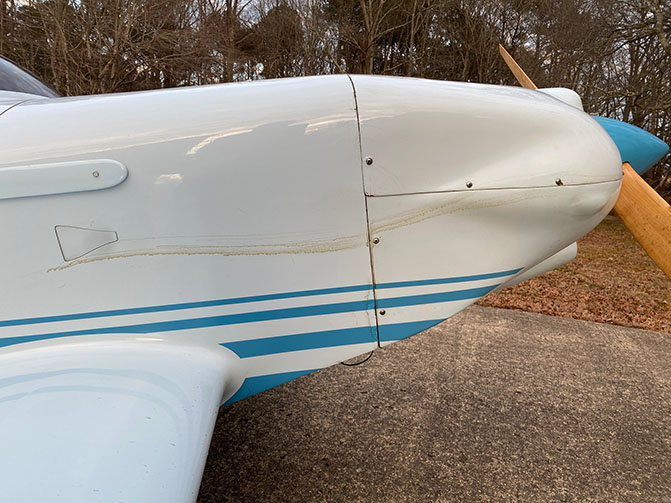
So, no longer do I have to wash the canopy, and wipe down the area around the inlets, and even down the length of the cowling. This photo says a lot about airflow on an airplane that either has less exit area than the inlet area, or in the case of this airplane, the cooling fin area of the engine is very tightly sealed, and there's insufficient area for the air to get from the inlet to the bottom of the engine....so it just comes right back out the front. So if the front bearing seal is leaking oil, it goes right back out with it, rather than out the bottom of the plane. This problem is even worse in the winter, because I tape over the oil cooler with aluminum tape, so there's even less path of escape for the incoming air. An unintended benefit is that the bottom of the plane stays fairly oil free, and even the engine doesn't leave oil on the floor. It's far more convenient to wipe it off the cowling and the canopy!
Mark Langford, ML "at" N56ML.com
Return to my other website, with links to a hundred other KRs, at www.n56ml.com., or to my www.krnet.org website.