revised March 12, 1997
I've finally settled on what I think is the best way to make an accurate composite surface. This only works on projected surfaces, those that can be created by putting a template on each end of a piece of foam and sanding to contour. This constitutes the majority of surfaces on the KR2S.
Having already built a forward deck/fuel tank, I was a little reluctant to start over and do it again. But the thought of 17 gallons of fuel in my lap (along with a battery and several hundred feet of wire!) just didn't sit well with me. Wing tanks began to look better as time went on. Because I already plan to use fuel injection, a fuel pump is required. And because I'm seriously thinking about not using a mag, a backup battery will be required anyway. So I already have the backup electrical system in mind. And since the cg of fuel in the wing tanks is almost centered on the CG of the airplane, shifts in CG due to fuel burn will be imperceptible. The normal forward fuselage mounted header tank, on the other hand, creates dangerously large CG shifts as fuel burns off.
Which leads to the empty forward deck, or baggage compartment if you so desire. About a year ago, I tried to create this same surface (for what was to become the now defunct header fuel tank) in reverse. I sanded the foam to contour and glassed the outside, hoping that I could remove it, hollow out the inside, and glass it. Wrong. It just curled up into contorted mess. That led to a more carefully thought out method that is, admittedly, more labor intensive, but created excellent surfaces with very little finishing required.
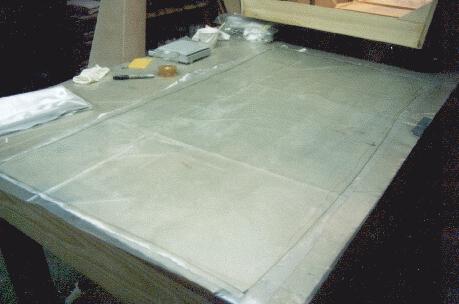
The first step was to determine the shapes of each end of the deck. This was easy for me, as I still had the templates left over from the fuel tank episode (shown above). These templates are merely the shapes of the firewall on the forward end and the instument panel on the aft end. I then made another set of particle board templates identical to these, except with a 3/8" offset, the desired thickness of my final product.
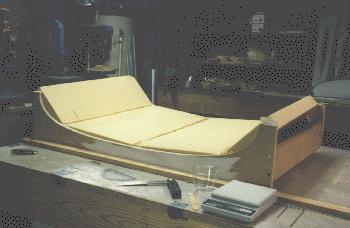
These two templates were then fastened together to create a jig into which three pieces of 2" thick urethane foam were placed. This was a friction fit (with the foam resting on 2x2 support blocks) to avoid having foam chunks broken out by glue removal.
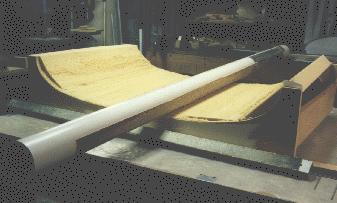
A 4" PVC pipe with 20 grit self adhesive sand paper (made for floor sanders) was used to shape the foam down to what would become the inside of the deck. This takes about 20 minutes.
I then used the plastic sheet layup method to apply a layer of 5.85 oz fiberglass to the inside surface. This little known method is accomplished by first laying a sheet of 4 mil plastic (builder's plastic from Home Depot) over the object to be glassed, and outlining the shape with a Sharpie marker. The plastic is then laid out on the layup table and glass is rolled out on top of it. The glass is laid out with about two inches of excess border extending past the border defined by the plastic. You now know for a fact that the glass you are wetting out will cover the area intended. Straighten the lines of the BID weave and cut, ensuring that you have a piece bigger than the plastic. Mix up some epoxy and pour over the glass in over a large area using a zig-zag pattern to "stake" the glass to the plastic, squeeging away the excess, but making sure that there are no light areas which indicate insufficient wetting.
When all is wet, mix in micro with the rest of the epoxy and work it into the foam contour with the squeegee. When all foam has been covered, lay your plastic/fiberglass sandwich on the foam with the glass side down. The plastic makes this step simple, and holds the weave perfectly straight and perpendicular. It's also easier to manuever the glass into position if you don't get it where you wanted it to start with. Once it's where you want it, start forcing the glass into contact with the squeegee, applied to the plastic, kind of like applying a decal.
Cut the plastic/glass sandwich around the borders of the part, leaving no more than a quarter inch hanging over. Any more and a void will result at the edges because the weight of the excess will separate the glass from the foam adjacent to the edge. Peel the plastic away, and you're almost done. Squeegee the whole surface to bring the glass into intimate contact with the foam and micro. Come back in about four hours and cut the glass to conform to the edges within an eighth inch or so with a razor knife. You can do this later, but it's a lot easier to cut now that later. Let it cure overnight.

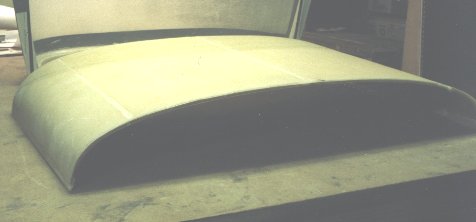
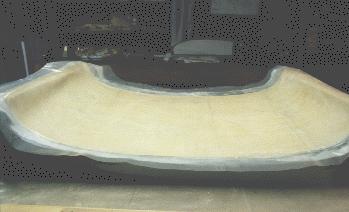
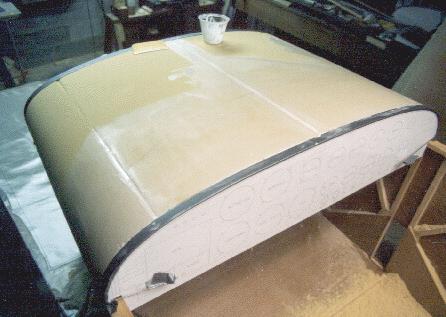
This is what you'll have.
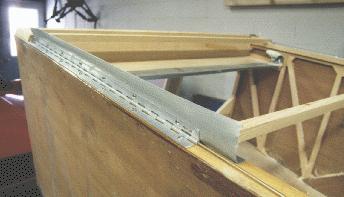
Now you need to prepare the longerons for the hinge mounting system. Piano hinge mounts will allow the deck to be easily removeable by merely pulling the hinge pins. First, screw the hinges down the longerons with number 4 wood screws, spaced every few inches. If you plan to hinge the deck open with the hinges, you'll want to turn one of them opposite to the way I did mine, with the hinge pin outside. I decided that if I were to make mine a baggage compartment, I'd just cut a whole new door into the deck. But at the moment, I don't plan to put anything up there but my battery.
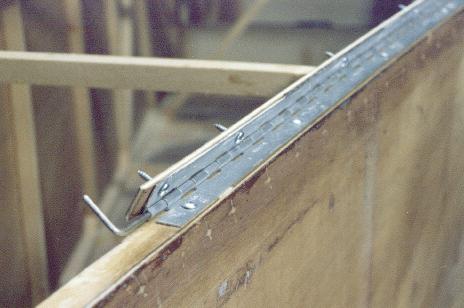
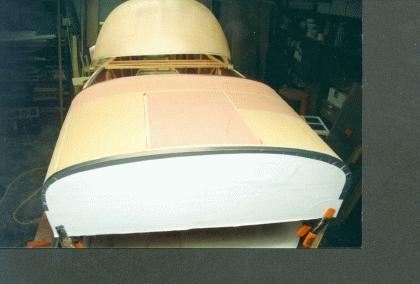
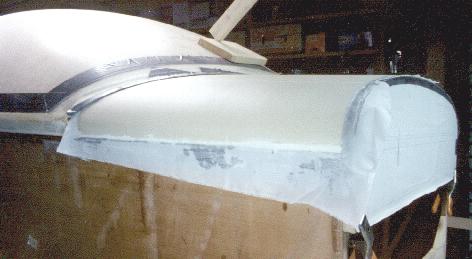
Now cover the longeron and the hinge that's attached to it with duct tape, so that micro won't stick to them. Attach the other hinge half with the hinge pin (with holes already drilled for the plywood sill), and cover the top side with duct tape, sticky side down. Stick the tape only to the upper hinge half at this point, because you still need to screw the plywood sill to the hinge (see above picture, which is actually on the AFT deck), and don't stick it the part of the hinge that mates to the lower half, since this would prevent rotation.
Cut a strip of 3/32 plywood that will fit the hinge and the thickness of the deck. Mine was about 5/8" wide and fit nicely between the outer and inner skins of the deck. Flip the hinge half over and screw the plywood to the hinge from the bottom. Fold the hinge down flat and seal the tape down against the longeron, and over the area of the hinge where the pin connects the two hinge halves. You have now completely protected the hinge from being permanently epoxied to itself with micro, so you can work on the connection between the top hinge half and the deck itself.
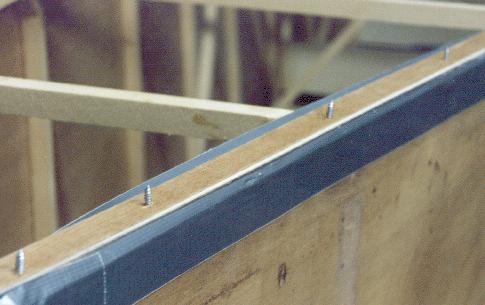
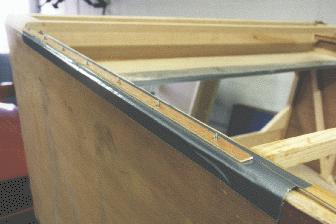
You should have something that looks like the picture above, with screws protruding to help hold it all together.
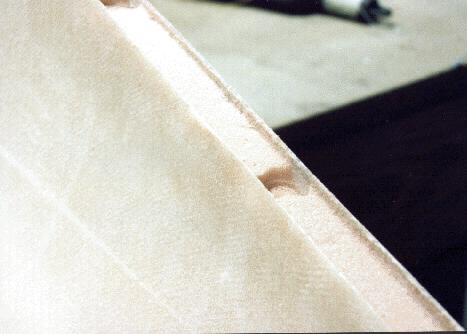
Prepare the deck by removing foam from the edges of the glass to a depth of 3/8" or so. I used a tiny wire wheel on a Dremel tool. This is the perfect tool for this job, and leaves a nice radius inside. The pockets are for extra micro where each screw is located, for higher strength. After "priming" mating surfaces of glass and foam with straight epoxy, mix up some fairly dry micro/epoxy (just enough so it doesn't run out and make a mess) and fill this channel with it. Leave a little mound that will squish out when pushed down over the foam sill.
Prime the plywood sills with epoxy and set the deck on top, ensuring that the sills get up between the inner and outer walls of the deck. Push the deck down lightly to fill all of the voids with micro and let the whole thing cure.
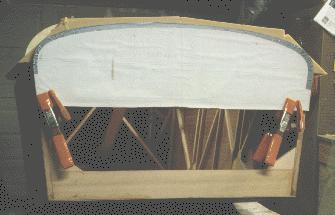
Install your particle board firewall and instrument panel templates at each end of the deck and clamp the foam between them with a straight edge that has sand paper glued to it.
I used an aluminum channel with a piece of self-adhesive 20 grit floor sander material stuck to it. Sand for about twenty minutes and you'll have the outer shape of the deck finished. Make sure that this foam surface is a perfectly smooth as you can get it. It's a whole lot easier to make this shape perfect now, than it it to try to shape and sand it when it's covered with micro. The last few minutes should be spent sanding side to side, parallel to the templates, to remove any sanding marks. Remove the templates and apply duct tape to the edges, and reposition again. If you want a joggle, for example for the cowling edge to cover on the front of your deck, drop the template a little and sand the left and right edges of your template slightly.
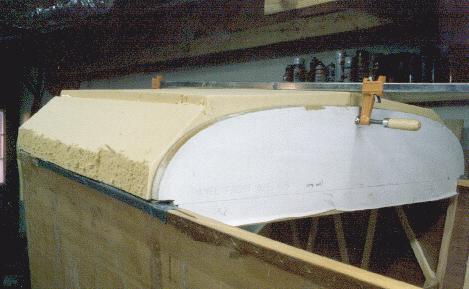
Now it's time to fiberglass your creation. Again, cut a piece of 4 mil polyethylene a few inches larger than your fiberglass needs to be. Lay it over the deck and mark the edges of your deck on the plastic. You should have a border a few inches larger than your deck all around the guidelines. Cut a piece of fiberglass about the same size as your plastic and lay it out on the plastic, ensuring that the strands of glass are all straight and perpendicular. Pour epoxy on the glass on the plastic and smooth around, being careful not to disturb the orientation of the fabric. Use just enough epoxy to wet out the glass. Squeegee away the excess. You now have a piece of fiberglass with proper weave orientation, complete with outlines and a backing sheet to cut along so that it will be a perfect fit on your deck.
Prime the foam with runny micro and squeegee away the excess. Lay on the fiberglass and polyethylene sandwich, plastic side up and squeegee thru the plastic to bring the glass into intimate contact with the foam/micro. Once positioned, cut around the edges to within a quarter inch of finished dimensions to reduce overhang.
Slowly peel away the plastic back onto itself (180 degree angle disturbs the glass the least), leaving the glass in place, with weave still oriented perfectly. Squeegee again just to make sure that all air bubbles are gone. Cover this layer of fiberglass with a layer of fine "satin weave" 1.9 oz glass and you'll have no pinholes to fill later. This step is a real time saver, and helps make the surface a little stronger too. OR, you could then apply a layer of peelply to the whole thing, and squeegee it into close contact. Allow to cure completely and remove the peelply if you used it.
Peelply gives you a surface that's prepared for more overlapping layups later on, but if you need two or three layers of glass on a part, do them all at once. The peelply is used only to either leave a pinhole-free surface (if you're not using the satin cloth), or if you plan to layup something else on part of your layup later.
Now that your deck is super strong, pull the hinge pins out and pry up between the hinges to pop the deck loose from the longerons. Remove the upper hinge pin from the duct tape which covers the plywood sill, and remove the duct tape. Sand a slight radius on the edge of the sill and apply a layer of fiberglass tape to reinforce the connection between the inside deck skin and the sill. Install the hinge half again, covered with duct tape to hold the tape in place while curing, and reinstall the deck on the plane to cure. After cure, remove the hinge and the tape, and epoxy the hinge half to the skin permanently.
The final result is a forward deck skin 3/8" thick and very strong. You may then build a fuel tank or a baggage compartment under it.
Update - 2007: Something I'll do differently next time is to incorporate my glare shield into the front deck, so the instrument panel is tucked underneath, with about two inches hanging over to shade the instruments and provide a place to run a strip light for panel illumination. As it it, I've had to build a separate glare shield (and flew for 450 hours without one) that will weigh more, and has been a safety hazard in a crash (the sharp edge of the panel could have cut my head wide open).
Return to Mark Langford's KR2S Project