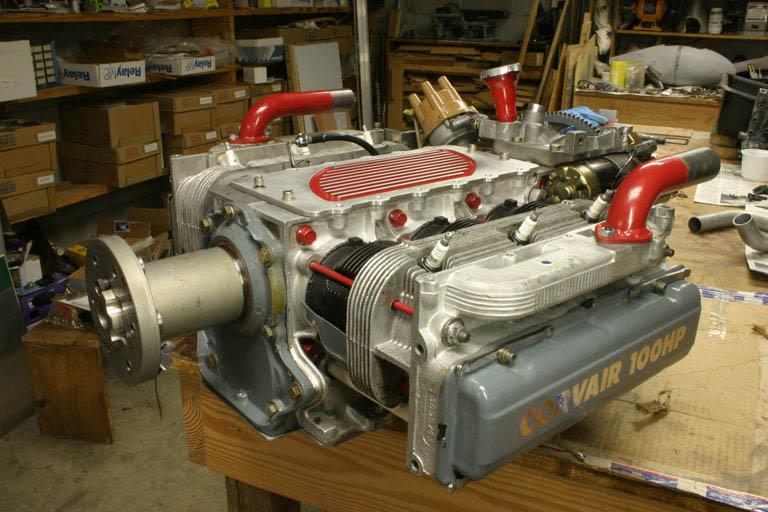
Mark Langford's KR2S - 2700cc engine after 270 hours
2700cc Engine "Condition Inspection"
created August 27, 2006
I've put 270 hours on my 2700 engine in the last year. It's really more than that, given the way a typical airplane's Hobbs meter works (oil pressure). But my hourmeter is an EIS function, which I have set such that it only counts time above 1200 rpm, so these are REAL FLYING hours, not just Hobbs hours (which are counted any time the engine has oil pressure). I'd only planned for it to be a "stop gap" engine when I first built it, because I knew it would take a while to get all the machine work done to build another 3100cc "Big Boy", and I wanted to get back in the air. Well, I got back in the air, but I never dreamed it'd take this long to get all of my 3100cc parts. The sad fact is that there are only a few people on the planet who modify Corvair parts for VW pistons and cylinders, and those few are not in as big a hurry as I am, and I still don't have everything I need to build the 3100.
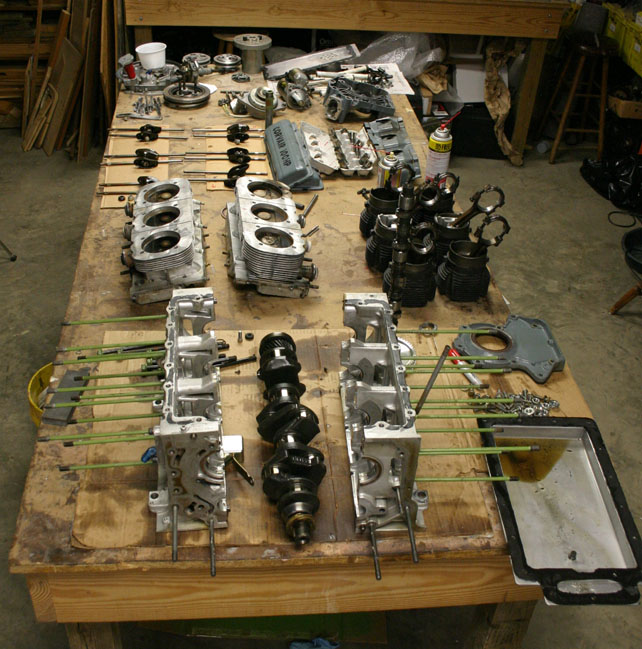
My annual "condition inspection" is due Sept 1st, so what better way to check things out than to do a quick "look see" in the engine compartment? There are a few things that need some attention. The oil pressure has always been low on this one... "marginal" at the minimum of 10 psi per thousand rpm most of the time, but when the oil is hot, even less. Bearing clearances were checked before assembly and were good, but this engine has a stock pump, as opposed to the 3100cc engine which had a high volume pump. I've landed with the EIS complaining about 2 psi on final, and that gets a little disconcerting (makes you wonder what the bearings look like). Both oil filter and oil cooler are mounted to the firewall, so I have about 8 feet of oil lines running around in the engine compartment.
There's also been a small oil leak at the rear cover that's been with me since day one, as well as a 68/80 differential compression on cylinder #1. And I figure it wouldn't hurt a bit to magnaflux the crank to see how it's doing, since I have one of the highest time KR/Corvair cranks so far (if not THE highest). Since I've had a nitrided crank sitting on my bench for over a year now (for the 3100cc engine), I'd be an idiot to go down in the woods with a broken crank with this one sitting on the workbench.
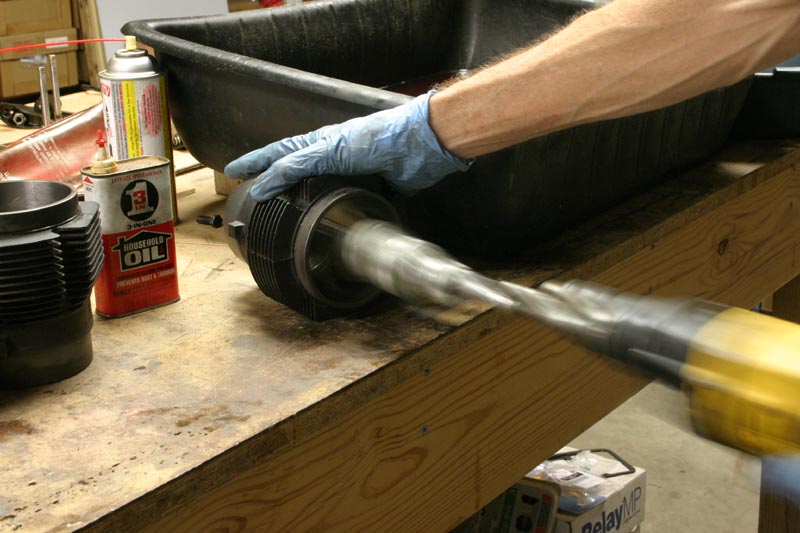
So I've been toying with tearing it down for months now, but the detonation incident I had a few weeks ago really got me thinking that I wanted to see the insides of the combustion chamber for cylinder number three. Last Friday morning I was flying to Columbia, TN to see if Troy Petteway was at the airport. It was really soupy with low ceilings, and I was lower than I like to fly to stay under the ceiling. The engine developed a tiny vibration that probably nobody but me would even notice, so I swapped ignition systems, but no change. I decided that was it for me. I wanted to know what was going on in there. I turned back, landed at home, and did a compression check just to see what the story was.
The differential compression check was not that bad by certified aircraft standards, with the average being 76/80 (not counting number one), but number one was still 68/80. I then did an "automotive" compression check, and although most were around 150 psi (I have 9.3:1 compression ratio), number six was an "out of range" 176 psi, telling me it had a serious carbon buildup on at least one cylinder. That did it...it was coming apart! Results are below:
#1 68/80 158 psi (rings, and it's been this way since the first compression check)
#2 77/80 142 psi (rings)
#3 73/80 143 psi (rings and slight exhaust valve)
#4 76/80 152 psi (rings and slight intake valve)
#5 78/80 157 psi (rings)
#6 75/80 176 psi (rings)
I've been wanting to put Total Seal rings in this engine since my first compression test. The 3100cc engine had 79/80 or 80/80 on all six cylinders until the day it died, but I assembled this one without them, because I was in a hurry to get flying in time to make last year's KR Gathering, and forgot to specify Total Seal rings with the piston/cylinder kit. All the other engines that I've built for myself over the last 30 years have had Total Seal rings, and this one will be no exception. The 3100cc engine had a confidence-inspiring resistance to having it's prop rotated...it took some real effort to turn over...but the 2700 has always been a disappointment in that department.
Another thing I wanted to do was magnaflux the crank, and with a prop strike on it (even though the engine was idling and didn't even notice the slight hit on the pavement), some folks would have insisted on a teardown right then and there. With the future 3100's stress relieved, shot peened, nitrided, and freshly polished crank just sitting on the bench, why not swap it into the 2700 and have the 2700's "first" crank magnafluxed at my convenience?
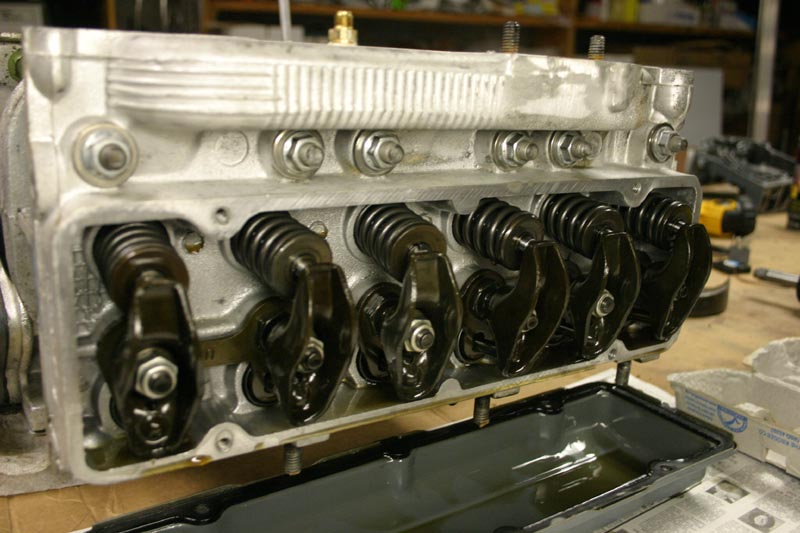
A few hours later I had it down to the smallest piece. I was amazed at how clean the inside of the engine was, how nice the bearings looked, how tight the valves were in their guides, and that sort of thing. I'll still replace the exhaust valves, just as a matter of principle, even though they are all sealing well and could probably be reground. I'll just re-lap the intakes, since they look like new once cleaned up.
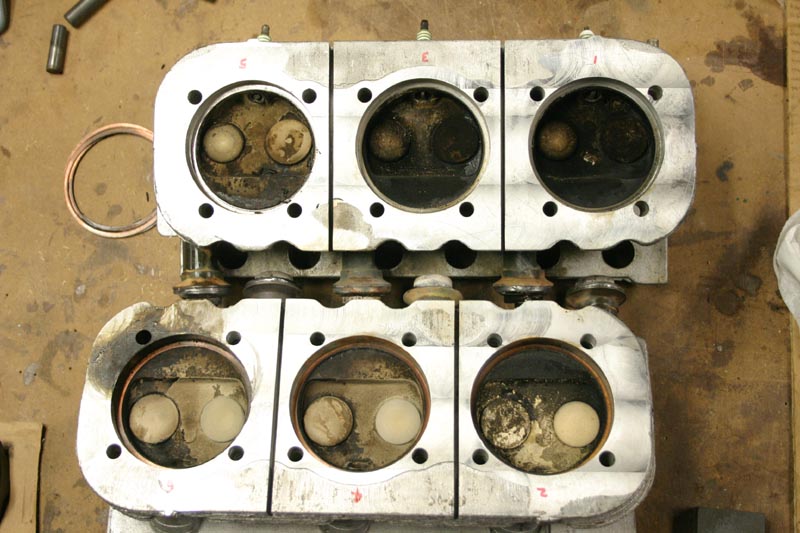
But I was also disappointed at the carbon buildup in the combustion chambers and piston tops. It's not like I've been flying around full rich or anything! I guess I'm used to seeing combustion chambers that have been running fuel injection, but this thing looked like it had 100,000 miles on it. It looks like one side was running leaner than the other, which was not surprising, as the plugs told me that last time I replaced them. I've looked for intake leaks several times and found nothing (not much way a solid aluminum tube and some rubber hose can leak), but before I reinstall the engine, I'll pressure test the carb manifold under water just to make sure. As I investigated further, oil control became more suspect.
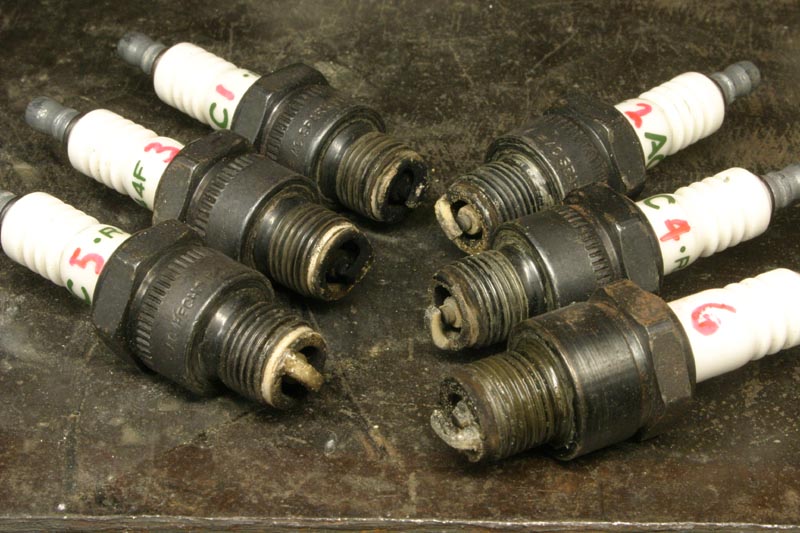
These spark plugs tell me that although the compression is reasonable, this engine is not particularly healthy, at least not up to my standards. Especially after only 50 hours (on these plugs). They didn't look this way in the early days. These plugs (the ones that are light enough to see) look as though they're trying to burn something that they're not supposed to be burning, and my first guess would be oil, and second would be the fuel quality itself. I've been putting Raceway gasoline in it lately, so it might be interesting to switch to Amoco or Chevron for a while and see what happens. I'll probably do that for the next 50 hours and see if there's any difference. If I didn't know any better I'd say number six spent its life in detonation mode, but it hasn't. It is often the highest EGT cylinder though, although its CHT is usually the coolest, being out front.
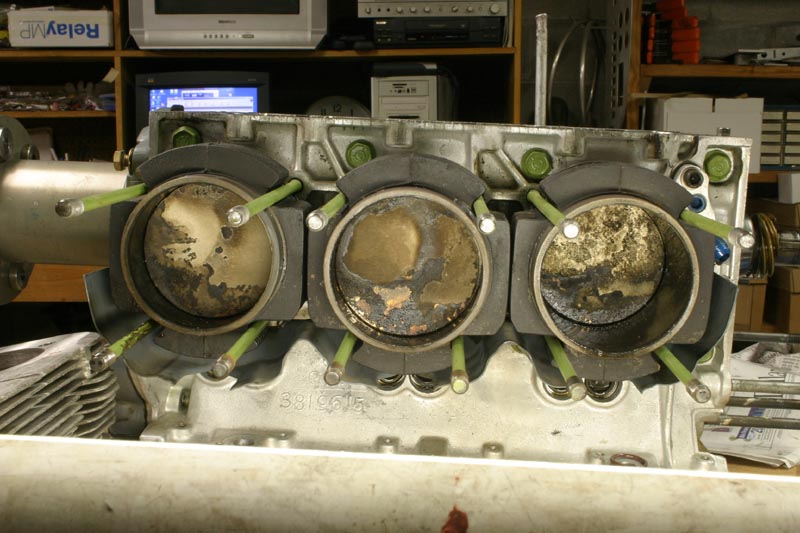
There has to be a reason for this level of buildup, but I don't don't know what it is. Incomplete combustion, oil contamination, low fuel quality, or all three? Total seal rings might help, but I wouldn't swear to that. Almost all of these 270 hours were on 93 octane auto fuel. The 3100cc engine with Total seal rings had spark plugs and combustion chambers with zero deposits and a perfect combustion appearance, but then it only had 40 hours on it. Still, I put new plugs in this engine 50 hours ago, and a couple of them look a little blasted! Something's not right with the combustion process in this engine, and I think ring sealing is one of them, at least on a couple of the cylinders.
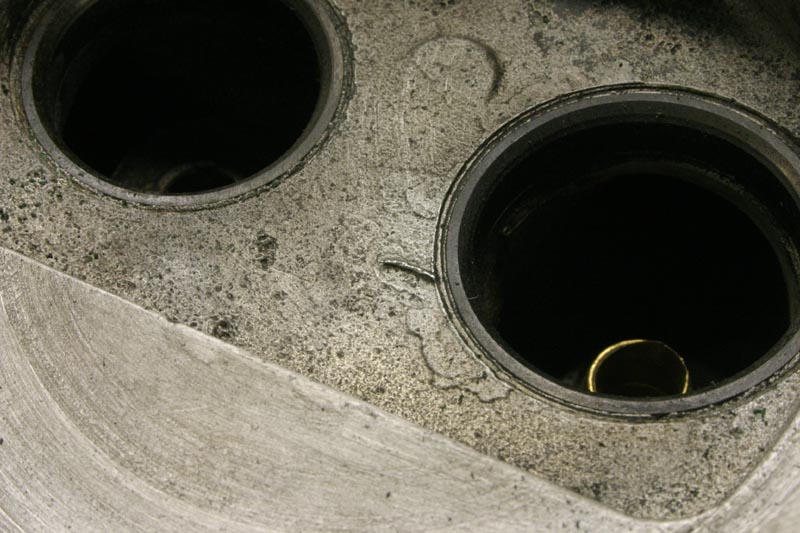
The detonation incident a few weeks ago (brought on by 87 octane fuel) may have been precipitated by this sharp little nub sticking up out of the chamber, or maybe some of the carbon deposits that were present on teardown. I can't believe I missed this the first time around, but a Dremel tool took care if it in about 10 seconds. As you can see from the surrounding area, this head is no spring chicken, but when I built this engine is was going to be "temporary". The good news is that the gasket surface looks perfect, with no recession at all, despite the 485 degree head temperature (measured at the plug). The only indication of detonation is that the back side of the #3 piston is a slightly darker shade of tan (fried oil) than the rest. This is one tough engine. Contrast this with the Jabiru, where I heard that an indicator on each cylinder changes color at something like 383 degrees F, and they void your warranty for you if you exceed it!
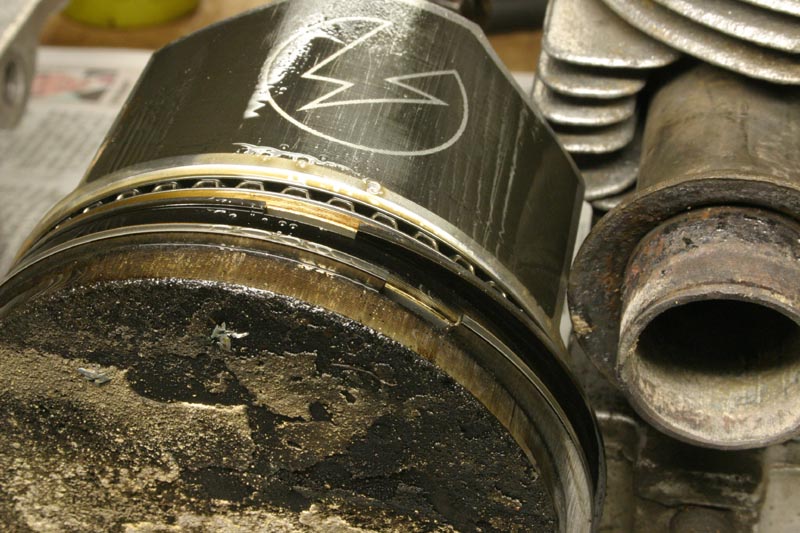
Upon disassembling the pistons from the cylinders, I was amazed to discover that the two top compression rings were aligned with each other on cylinders 2,3, and 5, and one of those also had BOTH oil rings lined up with the compression rings! Now I KNOW they didn't go together that way, because I went to great detail to put them in correctly, and even documented the correct orientation in my builder's log, so what's up with that? The gaps were all at the tops of the cylinders, so apparently gravity pulls the continous part of the ring down, leaving the gaps at the top. I never thought of that before, but that's obviously what's happening. It is interesting that number three was one of these cylinders, as oil contamination of the fuel/air charge is one of the factors that increases likelihood of detonation. We'll see how Total Seals work when they get some hours on them, but I never had this problem with VW engines, at least not that I noticed upon teardown. Some varnish at the gap position tells me that these rings were no longer rotating around the piston.
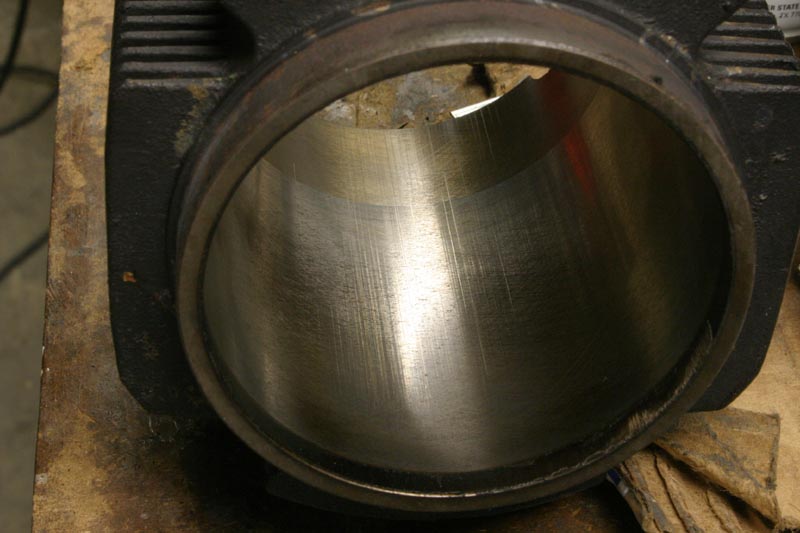
Most of the cylinders were lightly scratched by debris like this one. There was no discernible ridge at the top after the carbon was removed, and you could still see cross hatching over the full cylinder before I honed them.
I used a "glaze breaker" to clean up what little glaze was there and to give them a new crosshatch pattern to help the new rings seat.
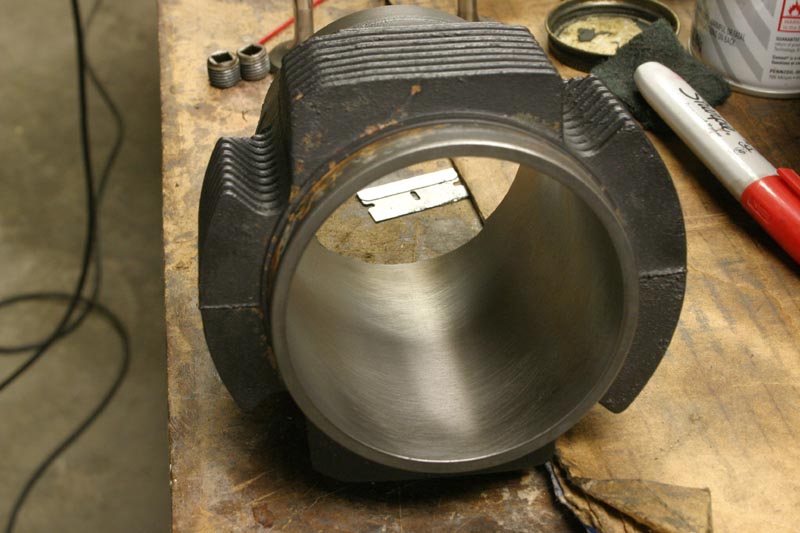
What few scratches there were disappeared in less than a minute of honing.
The rings grooves in the pistons were still shiny aluminum, so no groove cleaning was required. The pistons look like new, now that I've cleaned them up.
Getting the Ultra Black silicone off the cylinder spigots was time consuming and left a lot of silicone shavings on the case, so I removed the galley plugs and pressure washed the whole thing. I walnut blasted the heads clean, and then pressure washed them to clean out the walnut hulls. A little light work with the Neway valve cutting tools and a little lapping, and the valves were ready to go back in.
Before installing the "new" crank, I cleaned the oil holes with a 22 caliber rifle cleaning brush. There was a lot of crud in there. Soaking it in kerosene for a few days had loosened things up. I blew the passages out with air, and now it's ready to install. If I had skipped this little detail, and lot of crud and metal shavings would have gone straight to the bearings the first time I started it up!
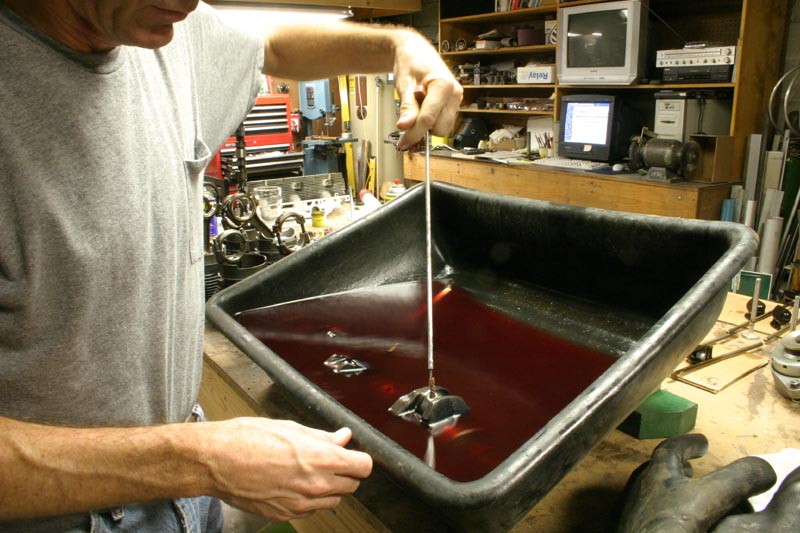
Until I get the crank magnafluxed, I tried the "ring test" as described by Bob Helt in his excellent book, "The Classic Corvair". Just stand it on end and lightly tap the crank in various places to see what it sounds like. No dull thuds allowed. First I tried the one I just removed, and it rang nicely, with the same tone everywhere. I concluded it had a nice consistent tone and was good. Then I tried the crank that's going in the engine now, and it rang even better, with harmonics lasting 2-3 times longer until it faded away. I'd call that inconclusive, not knowing what I'm doing. We'll let Mr. Maganflux answer the question.
Now might be a good time to mention that this engine is just like my 3100cc engine except the crank has been nitrided. Same prop hub, same rear starter setup (although I did stiffen the ring gear with an aluminum plate). The prop is different, but I did run the same Sterba for 30 hours or so while waiting on a replacement Sensenich after my prop strike. Of course this one is 2700cc, rather than 3100cc, so there's a 15% difference in crank loading that I think is important. One other little detail difference is that I did not use the offset bearing on the 2700cc engine. I bought two bearing sets and used a "normal" bearing for number 4. No point in putting any bending forces on the crank that it doesn't need. Not that this means anything, just that I did it that way. Ray Sedman agreed...he doesn't use the offset bearing on his racing engines either. And now I guess you can call it "flight tested".
Before I tore the engine down I weighed it on a digital scale as it's shown in the photo. 215 pounds is the bottom line. This is everything but exhaust and intake system, no oil, and includes my 4.5 pound prop hub (including bolts) and an 18 ounce steel safety shaft, nut, and washer (my shaft is longer than most). My intake manifold weighs 5.5 pounds, carb is 2 lbs, exhaust is 9 lbs, and distributor cap, plug wires, and plenum are about 3 pounds, but they are not installed in the photo nor are they included in the 215 pounds (since they are conveniently still attached to the plane). The only thing missing needed to fly is oil and an airbox, and box is maybe 2.5 pounds at the most. Bottom line is 244 pounds if you count oil. That's almost exactly what I've been saying for years now (since I weighed mine before installation)..."245 pounds ready to fly!" Most people don't count the prop hub though, and I'm also counting the 3 pound generator, so maybe you could argue 237 pounds, but then it's not ready to fly, so...whatever. Best I can tell by comparing its accuracy to a calibrated scale, this scale is accurate to within a pound. If you had trouble following that, try this:
215 - engine with distributor, generator, prop hub, 4130 safety shaft
5.5 - intake manifold, rubber tubing, clamps
2 - Ellison carb
3 - distributor cap, wires, intake plenums (equivalent to baffles for most installations)
9 - exhaust system (admittedly a little heavy, made from thick wall SS tubing, but will last forever)
7 - oil
2.5 - airbox
-----
244 pounds total
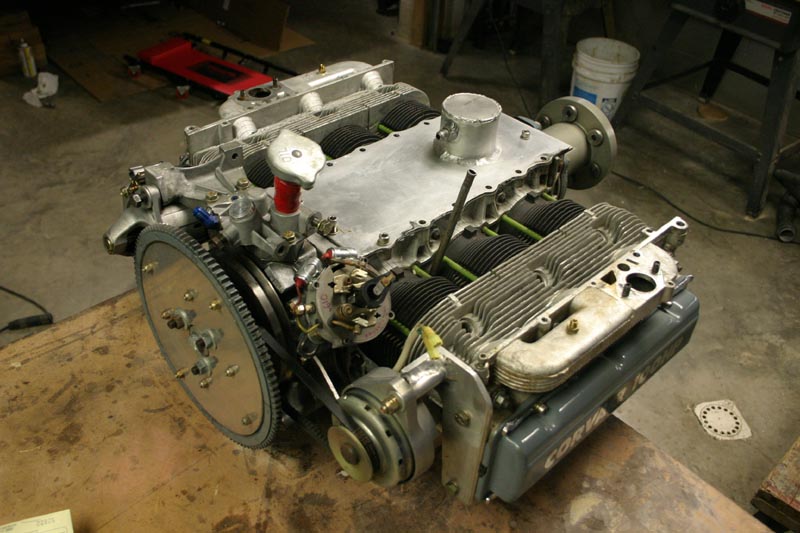
All parts are now inspected, cleaned up, and ready to install, so it's just a matter of reassembly. My plan is to have the engine back in the plane Friday night, so grand total time spent "freshening up" the engine will be about a week of spare time. Break-in oil will be on straight 30wt.
It's just about ready to go to airport. The gray stuff is all recycled parts from the original 3100cc engine, which were powder paint coated. The next 3100cc engine will be a little different looking, now that I have some idea where I'm going with this.
To reiterate what I've alluded to above, I didn't really NEED to tear my engine down, especially since there was basically nothing wrong with it other than cruddy plugs and some combustion chamber deposits. Don't get the impression from this that the TBO for a Corvair is 300 hours. I'm just a little pickier than most about my combustion chambers and what I expect to see when I remove my spark plugs after 50 hours. And unlike most folks, I find rebuilding an engine to be somewhat "therapeutic" (but that doesn't mean I'll redo yours for you). I've probably spent $400 on this effort, but that's not such a big deal when you consider that I've run $4500 worth of fuel through it in the last year. And contrast that with giving an O-200 the same treatment!
I expect Total Seal rings to go a long way toward solving the crud buildup, and I plan to start running 25% 100LL mixed with 93 octane auto fuel from now on to see what effect that will have on exhaust valve seat life. I'll probably also throw some Techroline in the engine on occasion. I have been running Marvel Mystery some of the time, just for the record. We'll see how the plugs look at 50 hours, and if necessary I'll make other changes, but don't expect to need to. I'm seriously thinking of converting the primer system into a water injection system during the summer months, just to "steam clean" the combustion chamber and prevent this kind of buildup, but that'll be a last resort. I know Steve Makish tore down an engine with 180 hours of flying on auto fuel and his chambers looked great, so this is not a universal CorvAircraft installation problem, so I'll get it figured out eventually. Steve's been using BP/Amoco 93 octane, so I may go back to that myself for a while and see what happens. My 3100cc engine had zero deposits at 40 hours, but that was mostly on 100LL, and using Total Seal rings. I'll get back to you in another year or so...
80 hours later, December2006-I did a compression check with 80 hours on this "cleanup", and also checked the plugs.
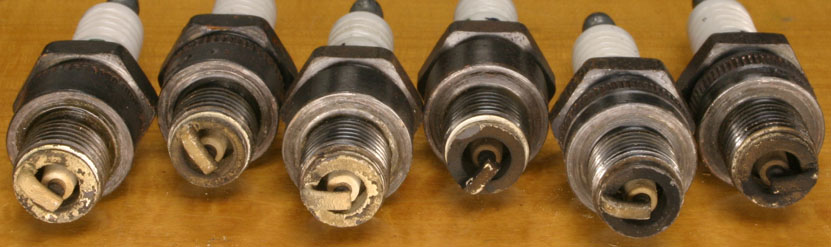
They were not that great! Here they are laid out #1-6, right to left (and staggered as if you are looking at the cylinders arranged on the crankshaft, propeller to the left). The compression check revealed the following:
#1 65/80 175 psi (intake, rings)
#2 80/80 138 psi (slight rings)
#3 76/80 184 psi (slight rings, slight intake)
#4 75/80 160 psi (intake, slight exhaust)
#5 79/80 155 psi (not much detectable blowby)
#6 80/80 183 psi (tiny detectable blowby)
There is a remarkable similarity between this set of numbers and the numbers at the top of the page, made 80 hours ago, despite a new set of rings and a freshening of the valve job. And plugs number 1 and 3 are dark in both sets of plugs, with coloration following the same trend between the two "plug cuts".
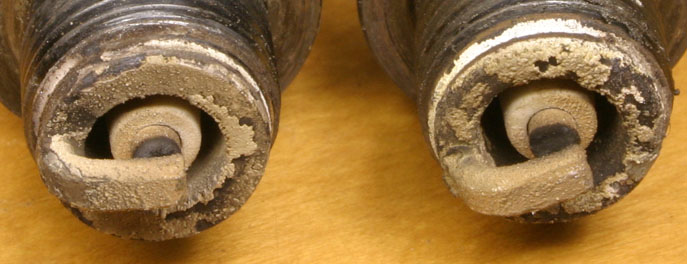
Number 6 on the left and number 4 on the right are built up with crud that appears to be lead deposits. These were new plugs just 80 hours ago! I blasted them with walnut hulls and they look new again, but the piston tops look very similar to these plugs.
Return to Mark Langford's KR2S